Thursday, 12 June 2014

Kairiche Lonche : Quick Raw Mango Pickle

Its the age of Instant : With Instant messaging to instant age miracles, we are living in "Instant-era". With food too, there is Instant coffee, instant breakfast mixes, instant cake mixes and the list goes on. With stress hanging over hand, time management becomes a task and we turn to all "quick-things" in our life! As much as i am a lover of "slow-cooking", there are some recipes which are quick-to-make and taste delicious too! One such recipe ( i would go to the extent of saying, classic recipe ) by my mother is the "Jhatpat kairiche lonche". Jhatpat in Marathi means quick. Kairi is raw mango. Lonche is pickle. There are times when you don't have the time and patience to go about making pickle the traditional way. This recipe comes to the rescue and makes for a good accompaniment with paratha or daal-chawal.


This pickle stays for about 15 days if you put in air tight container and store in refrigerator. For the first 1-2 days, you can keep keep it outside at room temperature if it's not too warm. 

Ingredients:

Raw Mangoes - 2
Red chilli powder - 1 tsp ( because we like it spicy, add 1/2 tsp and then add more if you want more spice )
Turmeric powder - 1/2 tsp
Asafoetida - 1/4 tsp
Jaggery - 2 tbsp crushed or grated or even add small chunks or pieces, they anyways melt in the pickle )
Oil - 1 tbsp
Mustard seeds - 1 tsp
Cumin seeds - 1 tsp
Salt- to taste 


 Recipe:

Wash the raw mangoes and pat dry.

Chop them into small cubes ( you can even cut them in medium size ).

Add the red chilli powder, turmeric powder, jaggery and salt. Let it marinate for 5 minutes.

Heat oil and add mustard seeds. When they splutter, add asafoetida and cumin seeds.

Pour the oil on top of the marinated mangoes. Mix it all well. 

After some time, it will start leaving juices. I love this juice. But if you don't like, you can strain it. This juice is a nice mixture of sweetness of jaggery and spiciness of red chilli powder.

It totally tastes "Chataaaak" ( as we call it in Hindi or Marathi meaning flavourful )

Jhatpat pickle is ready :)

Happy Cooking :) 

Linking this recipe to : Only summer food and drinks by Shailaja and Pari's giveaway


Monday, 9 June 2014

Paatvadya : Microwave recipe

Besan squares : Paatvadya are basically small vadis ( squares like a patty ) which make a great tea-time snack. I remember my mother giving me these vadis in tiffin for breakfast as kids. They are a much healthy option than to snack in chips or any fried items and well, they taste delicious. The traditional way of cooking paatvadi is on stovetop, but recently i saw a post from my friend Prabha Iyer on her blog ( http://prabhacooks.blogspot.in/2014/06/microwave-khandvi.html ) of making khandvi in microwave. I have made paatvadis the traditional way earlier (i shall upload that recipe too sometime soon when i make them after these finish ), but decided to try the same recipe of khandvi for paatvadis. And believe me, as experimental as it may sound, they have turned out super flavourful with a hint of tanginess ( due to the curd added ).


These vadis can be eaten along with any spicy chutney  or some even make a daal out of it ( Paatvadi-amti as we say in Marathi ). Well, for this time,  as pleasant as they are looking, i would want to eat them as it is. You can add red chilli powder to the paste while putting the mixture in microwave. I was not sure of the spiciness of the chilli paste, hence i didn't add it to the mixture but sprinkled red chilli powder on top. Another important ingredient of Paatvadi is grated dried or fresh coconut. I didn't have it handy, but you can sprinkle it on top if you have it fresh or dry roast it and add to the mixture before putting it in microwave.


Ingredients :

Besan( Gram flour ) - 1 n half cup
Curd - 1 n half cup
Corriander leaves - to sprinkle
Oil - 2 tbsp
Turmeric powder - 1/2 tsp
Mustard seeds - 1 tbsp
red chilli powder - to sprinkle ( if adding to the mixture, add about 1 tsp )
Garlic-green chilli paste- I used about 2 tsp of thecha( http://cookininpajamas.blogspot.in/2014/06/kharda-mirchicha-thecha.html ) that i had.
Asafoetida - a pinch
Salt - to taste
Oil - to grease a plate

Recipe :

Sift Besan and remove all lumps.
Beat the curd, so that no lumps remain. Add about 1 cup of water to it and mix well.

In a microwave safe bowl, add this curd mixture, besan , asafoetida, turmeric powder and salt. Mix it all well.

Microwave on high for 5 minutes. Stir the mixture well twice after every 1 n half minute.

After 5 minutes, remove from microwave, and add about 1/2-1 cup of water and mix it well and make a smooth paste.

Microwave again on high for 5 minutes.

Grease a plate with oil. You can sprinkle some corriander leaves and grated/shredded coconut if you have. Now put the mixture in the plate and with a spatula or a flat spoon, spread it evenly.

Let it cool and cut them in squares.

Heat about 2 tbsp oil and add 1 tbsp mustard seeds. When they splutter, add this tempering on top of the cut-squares. Sprinkle some corriander leaves on top. Since i didn't add chilli powder to the mixture, i sprinkled some on top.

Yummy easy snack is ready :)

Happy Cooking :)


Saturday, 7 June 2014

Kharda : Mirchicha Thecha

I haven't posted a lot lately as i had some crazy-busy weeks. Honestly, i had not cooked anything special to write about, apart from the regular sabzi-roti or daal-chawal. One for the fact, that i was too busy to cook anything special, yes... the 4 legged canine angels ( from my pet sitting appointments ) were keeping me busy. Since it's a vacation time, a lot of people going on holidays, my hands and my home was full. And believe me, nothing gets better than spending time with these cute bundles of joy. The walks, the play, the treat times everything keeps you on toes, but it's all worth it.
Here's a recent pic of mine, just to show you all how happy i have been.


But yes, i missed my kitchen and i missed my blog. It always was on the back of my mind to write something, but another reason took it's toll. Laziness!!! Yes, it's so super hot in Delhi that it really gets tough to stand long in the kitchen and cook something special. Managing the temperature for cooking becomes a difficult task, with everything going in the refrigerator every now and then. The fruits and vegetables rot, the chocolates melt, the cooked food becomes stale soon, and i hate to waste food. As the temperature rose to 44 degrees, all i wanted to do was drink water/fluids/juices/aam panna ( http://cookininpajamas.blogspot.in/2014/05/kairiche-panhe-aam-panna.html )
rather than eat. A light diet seems just enough than a whole cooked meal.

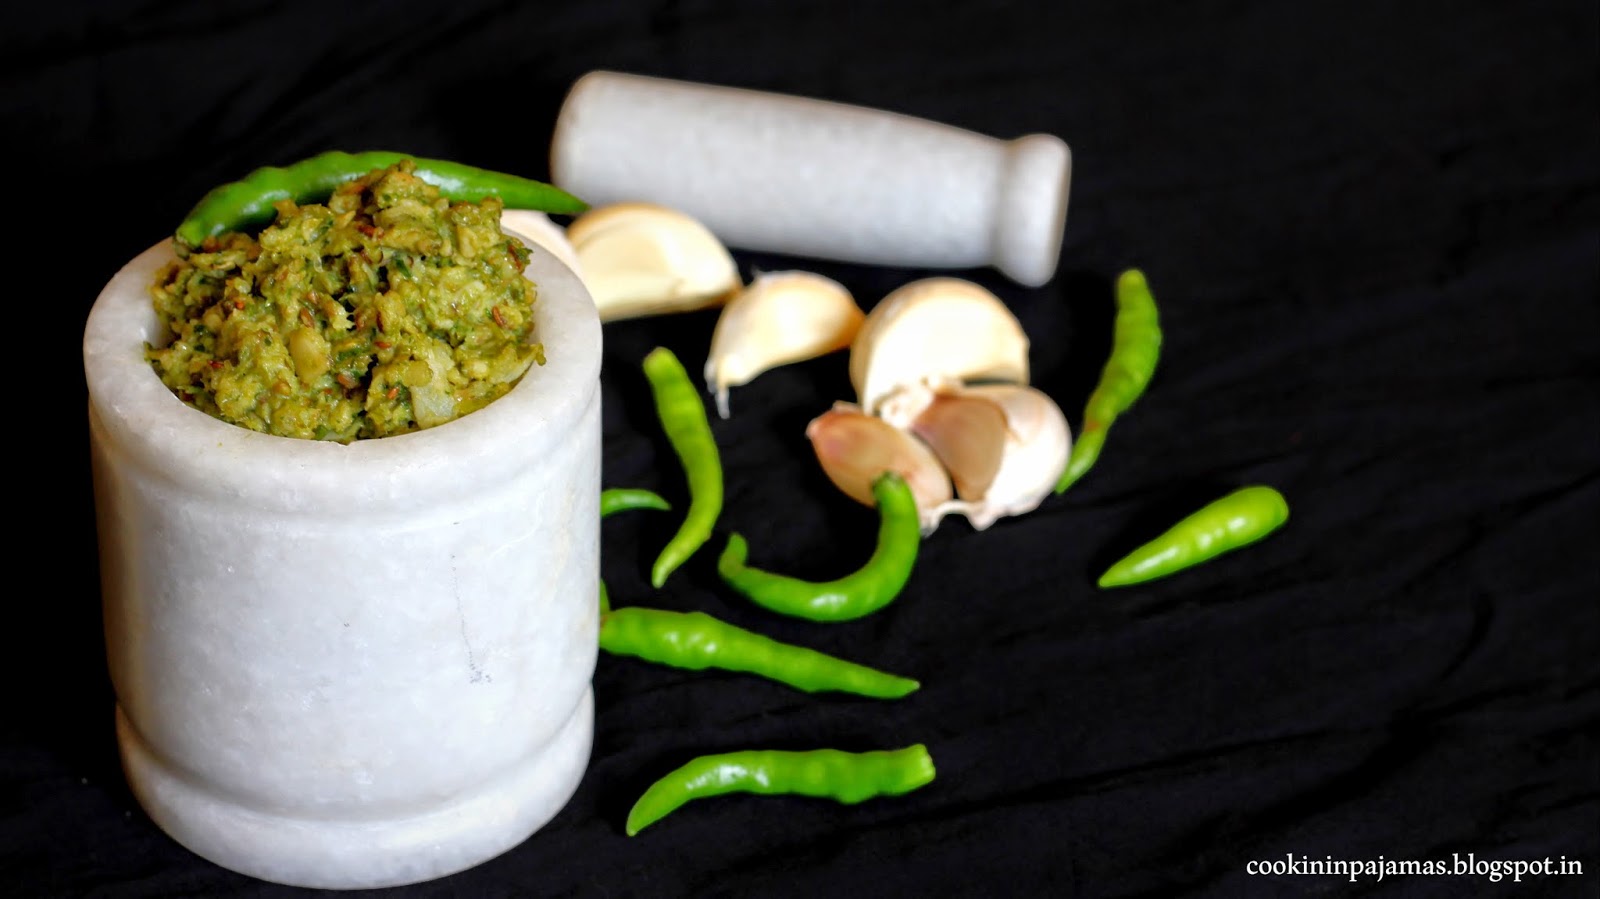
Now that i have some free time for couple of days with just one dog, i decided to get right in the kitchen and get going. Kharda is one of the Maharashtrian chutneys that you can enjoy alongside a daal-chawal or a paratha or traditionally we eat it with Bhaakri ( jowar/bajre ki roti ). Just yesterday i had made Vaangyacha Bharit ( Baingan Bharta ) and rotis and had it with Kharda. Also known as Thecha or Hirvya Mirchicha Thecha, this basically has two main ingredients of green chillies and garlic. 
You can even make it in bulk, store in refrigerator and add to any daal or sabzi , just to give a dish that "zing" of taste. Easy to make, it gets ready within minutes and for those who love things spicy, this is definitely worth a try.


Kharda is again a regional dish. Some make it roasting chillies in oil, some dry roast it, some add peanut powder, some make it without. Adding corriander leaves is optional too. It all depends on personal taste. I make all versions every now and then. This one is with peanut powder and corriander leaves.

Ingredients :

Green chillies - Around 30-35 
Garlic - 8-10 ( This time i had a different variety of garlic which had big chunks, if you have the normal variety take about 15 pieces )
Cumin seeds ( jeera ) - 1 tsp
Oil - 1 tsp
Corriander leaves - a few
Lemon juice - 1 tsp ( adjust to taste )
Black salt - to taste ( You can also use normal salt, but black salt adds to the taste)


Recipe :

Wash the green chillies, pat them dry and cut both the ends.

In a kadhai, put 1 tsp oil and fry the green chillies till they start getting brown spots. Frying chillies is a really tough task and the vapours get inside your nose and eyes, resulting in coughing, sneezing and running nose. So make sure to switch on your exhaust fan while doing this or keep the window/door of the kitchen open to let the vapour out.

Add the cumin seeds and fry for half a minute.

Now add the garlic and fry for about 5 minutes till the garlic gets properly sauteed and starts browning.

Let it cool and transfer it into a mixer jar. Throw in some corriander leaves, black salt and lime juice. mix it all well and grind to a coarse paste ( not too smooth and do not add water ).

Traditionally, the mixture is well grinned in a mortar and pestle. But since i don't have one here, i grind it in a mixer.

Now, would you like this "Death by chillies" ? ( Name derived from the famous sauce by Blair : Pure Death and After Death )

Happy Cooking :)


Tuesday, 20 May 2014

Methamba : One tangy relish !

Summers are associated with vacations from schools and colleges, holidays to hill stations, lots of play, visiting cousins and having ice-cold water right from the refrigerator! Yes, it has it's own fun! But for me ( and well, a lot more others, i am sure ) Summers meant ( and still does ) Mangoes!!! From the day mangoes would arrive in market, my mother used to convert the kitchen into a "Mangitchen"!!! Aamras along with puri or poli ( chapati) was a daily affair at lunch and dinner. Then there were days of mango milkshake, and mango icecreams. My Mom used to make great mango kulfi too. And of course, the pickle from raw mangoes, the refreshing drink Aam panna ( kairiche panhe http://cookininpajamas.blogspot.in/2014/05/kairiche-panhe-aam-panna.html )  and not to forget The Methamba.


Methamba is a raw mango chutney that is so sour, tangy and sweet that the flavours will burst in your mouth. It is a very simple Maharashtrian recipe. Some even call it "Methi-amba". Methi is fenugreek seeds and Amba is mangoes ( here raw mangoes or kairi are used ). It makes a great accompaniment with rice and daal or makes a great tiffin recipe when spread on a roti and made into a roll. It can also be eaten with a plain paratha or spread on a bread.


Ingredients :

(Makes about 1 n half cups of Methamba )

Raw Mangoes - 2
Mustard seeds - 1/2 tsp
Cumin seeds - 1/2 tsp
Asafoetida - a pinch
Oil - 2 tsp
Jaggery ( Grated ) - 3/4 cup ( You can even mash the jaggery with hand and mix if the jaggery is soft. Mine was hard, hence i had to grate it and it mixes well this way )
Red chilli powder - a pinch ( optional - just to get a hint of spicy taste )
Turmeric powder - a pinch ( optional )
Water - around 1/2 cup ( Just enough to cook the mangoes and make them soft )
Fenugreek seeds - 1/2 tsp
Salt - to taste

Recipe :

Peel the skin of the mangoes. Cut the mangoes into medium size pieces ( not too big, not too small - around 1 inch )

Heat oil in a kadhai. Add Mustard seeds, asafoetida and cumin seeds together. When they start to crackle, add the methi ( fenugreek seeds ). 

Saute till the methi is reddish in colour. Now add the chopped mango pieces. 

Saute it well, for about 2-3 minutes, so they get coated with oil and the seasonings.

Now add water and let the mangoes cook. You will know when they turn soft. If needed, add more water, but add little by little, as we don't want our methamba to be too watery. You can cover the kadhai or cook it in open. Mangoes anyway won't take long to cook.

Add in the jaggery and keep stirring continuously as the mixture will start becoming thick, the jaggery will melt. Make sure it doesn't stick to the kadhai.

Now add the red chilli powder, turmeric powder and salt. Mix it all well and let it simmer for about 2-3 minutes. Remove from heat and let it cool.

This can be stored in refrigerator for almost a week. But am sure it won't last a week, as it tastes so yummy that you would want to finish it off soon. 


This is a must-try summer recipe and am sure you all will love it :)

Happy Cooking :) 


 Linking this recipe to Favourite recipe event at Fullscoops and Swathi's event announcement page

Friday, 16 May 2014

Chole Kulcha Pizza Style !

With Birizza making news in the market, and getting all sorts of mixed reviews, fusion dishes are making their way in the kitchen. Birizza is a new dish launched by American restaurant chain Pizza Hut, wherein biryani cooked on a tava is sealed with a baked pizza topped with olive. To be honest, i haven't tried it yet so i have nothing to say about it. But i surely tried this fusion dish of serving Chole kulche in pizza style from the recipe of Chef Harpal Singh.


My Dad always says, " Be a Roman in Rome" which explains the fact that one should adapt to the surroundings and be flexible to whatever comes your way. I always apply this teaching of his when it comes to food and travel.As much as i miss eating Mumbai food in Delhi, i love the rich, masaaledar (full of masalas ), spicy, chatpata khana here. Chole Kulcha is to Delhi what Vada Paav is for mumbai. It is one of the most popular Street food dishes and it does taste terrific! As much as i cook chole often here, chole chaat is one dish i love to snack in too. Just boil the soaked chana, add in chopped tomatoes, onions, green chillies, some corriander leaves and some salt. Makes for a great evening snack. 

The same chole chaat served on a readymade pizza bread ( or we even get kulcha breads here ) adds to the presentation and tastes crispy and flavourful too.

Ingredients :

Kulcha bread/Pizza Bread - 1
Chickpeas ( White chana/chole ) - 1 cup ( Soaked overnight )
Onion - 1 medium ( chopped finely )
Tomato - 1 medium ( chopped finely )
Chaat masala - 1/2 tsp
Green chilli - 1 ( Chopped finely )
Red chilli powder - 1/2 tsp ( adjust according to taste )
Processed chesse/ Pizza cheese/ Mozarella - to sprinkle ( as required )
Salt - to taste
Butter - To apply on the pizza bread  


Recipe :

Pressure cook the chickpeas till they are soft ( took me about 3 whistles ). What i normally do is add about 1/4 tsp of turmeric ( haldi ) and 1/4 tsp of red chilli powder and 1/4 tsp of garam masala to the water while pressure cooking the chole. This way, i believe, the flavours merge in well. But it is optional. Let it cool and drain the water ( You can use this water to cook any curry later on, so refrigerate this and don't throw it away )

Cut the Kulcha bread or pizza bread into 4 portions. Now heat a tava and place them on it. Brush a little butter on top side of the bread evenly.
Add a little oil to the tava, and toast the bread till it becomes little brown and crisp ( Make sure not to brown it too much or else the bread will become hard )


Take the boiled chickpeas in a bowl, add the chopped tomatoes, onions and green chillies. Mix in some red chilli powder ( If required, according to taste ), the chaat masala and salt. Mix the mixture well. and divide it equally on top of the 4 portions of bread. 

Now add the grated cheese. Preheat oven to 180 degree celcius for 5 minutes. Grease a baking tray with some oil and place the 4 slices of pizza bread on top. Bake at 180 degree celcius till the cheese melts ( took me about 5 minutes ).

Sprinkle some red chilli powder on top and serve along with ketchup or as it is.


Easy- snack recipe and one wholesome too ! 

Happy Cooking :)


Monday, 12 May 2014

Aam Panna : Kairiche Panhe

I have been missing from the blog for quite sometime!!! Too many engagement kept me on toes! My pet sitting appointments, some invites to events and restaurants, spending quality time at home doing the cleaning stuff and of course hubby-time!

Delhi is known to have extreme climates, and summer time really drowns you down! Keeping yourself hydrated is quite a task when the mercury reaches as high as 47 degrees. So, i decided to make some refreshing aam panna and it did bring back some childhood memories...


Kairiche Panhe ( Kairi- kaccha aam -green mango ) is what we call it in Marathi. This drink occupied a permanent place in our fridge when we were kids. Summer vacations was all about playing, eating mangoes, and sipping on the panhe. Aam panna as it is commonly known as, is a preservative free drink and the concentrate lasts in the fridge for almost a week.


So go ahead, buy some raw mangoes, and make this easy recipe right away to make one awesome summer cooler. 


Ingredients :

Raw Mangoes ( Green Mangoes ) - 2
Sugar - 1 cup ( A lot of people add jaggery which i love to, but hubby likes the one with sugar . You can add grated jaggery or just crush it soft with your hands and mix it. Adjust the sugar according to taste. We normally don't like it too sweet )
Cardamom powder - 1 tsp ( I took 8-10 cardamom seeds and crushed them with mortar and pestle )
Black salt - to taste
Saffron - a few strands ( This is optional but tastes great when you add some )

Recipe :

Wash the mangoes and pressure cook them for 2 whistles with little water ( I added around 3 to 3 n half cups of water ). You can add less water( about 2 cups ) or more too, it will affect the consistency and thickness of the concentrate as we are going to use this water to make the concentrate.

Note : You can add the mangoes as whole or cut them into large pieces. Both ways is fine.

Let it stand for a while, and after all the pressure goes away, remove the lid of pressure cooker. Now mash the mangoes well into a pulp with hands. This would be easy as mangoes become too soft after 2 whistles. 

Note : You can remove the skin of the mangoes while mashing, as some people find the skin bitter. But personally, i keep the skin as it holds a lot of nutrients and i like a little tangy taste. Plus addition of sugar later on negates the bitter taste.

Now transfer the pulp into a mixer and add sugar, cardamom powder and black salt.  A nice smooth pulp is formed. Add saffron and stir to get the nice yellowish-orange colour.

Note : The pressure cooked mangoes are so mushy that you need not use mixer-grinder at times. I only add it to the mixer , so that it mixes well with the sugar. But you can alternatively pulp it with hand and add powdered sugar and then mix all the other ingredients. When adding jaggery, just mix the grated jaggery into the pulp with hands.
No water is added. Store this pulp in refrigerator. When required, Mix 1/4th of the concentrate to 3/4th of chilled water. Put some ice cubes and your drink is ready!
Some people even add mint leaves or roasted cumin powder for garnishing. You can try mixing it according to your taste. 

This drink definately occupies the top list in summers- all natural, fresh and cooling !

Thursday, 1 May 2014

Dudhi Halwa : Akshay Tritiya special

Dudhi, Lauki or Bottle Gourd is one vegetable that has to be cooked with special care, as it doesn't taste delicious when cooked in a simplistic way. So you always add to add some flavours and spice to it to enjoy it's taste. Whenever i buy Dudhi ( for all it's nutritional and medicinal benefits, i don't like to skip buying this vegetable at all ), i either make dudhi kofta curry or dudhi halwa. Recently my Mother-in-law told me one terrific way to make an instant ( and delicious ) dudhi sabzi along with moong daal, i will surely post that recipe soon! But meanwhile, since it's Akshay Tritiya tomorrow, i decided to post some sweet for this auspiscious day!!

Akshay Tritiya is believed to have been the day when Lord Ganesha and Ved Vyas began to write the great "Mahabharata". It is a very holy and auspicious day. For us, Akshay tritiya as kids meant eating sweets, going to temple and putting Rangoli at the door. This day is also associated with buying gold, as Akshay means Infinite ( something which never recedes ). So some charity done on this day surely gets you blessings, and good luck. New ventures started on this day brings in prosperity. So here's wishing you all a Happy Akshay Tritiya and loads of happiness!!!

( Pic taken from Google Images )

Ingredients :

Dudhi - 1 medium sized ( Make sure you always buy Dudhi which is long and elongated and raw without any stains )
Milk - 1 to 1 and 1/4 cup 
Ghee - 2 tbsp
Khoya - 3/4 cup ( I love khoya, and it's taste in the halwa. If you are not a Khoya fan, then add about 1/2 cup. You can skip this completely too and add milkmaid instead of Khoya or readymade pedhas/barfis )
Sugar - 1/2 cup ( we like it little less sweet, adjust according to taste)
Cardamom powder - 1/4 tsp
Cashews - for garnishing
Raisins - for garnishing

Recipe :

Wash the Dudhi and remove it's skin. Grate it. Let it stand for 2-3 minutes. Now remove water from the Dudhi completely.

Heat Ghee in a Kadhai and saute the grated Dudhi in it for about 3-4 minutes on medium flame. 

Now add Milk, mix it well and cook covered till Dudhi is well cooked. Keep stirring in between so it doesn't stick to the kadhai. If you find it too dry, add little milk extra.

Now add the Khoya ( separate/mash it with hands ), mix it well so that no lumps are formed. Cook for about 2-3 minutes.

Lastly add the sugar, cardamom powder and cashews. Cook till the sugar melts and the mixtures starts forming a ball like halwa.

Serve hot or cold as preffered. Also tastes great with vanilla ice cream if you want to create a fusion dish!

Happy Cooking :)


Sunday, 20 April 2014

Fruity Sponge Cake

Very Berry Healthy : A Great Day begins with a Healthy yet Tasty breakfast, but is more good when you have a Healthy snack to munch on when you have that in-between hunger cravings! Me and hubby get those a lot! And instead of having the regular buiscuits and chips, we decided to opt for something healthier and Smarteats came right in ! 
http://smarteats.in/ 
They have some really tasty wholesome snacks which you can carry in your tiffin or the packaging comes so neat with a seal-zip bag that you can carry it anywhere just like that ! They have Diet snacks, Cookies, Granola Bars, Tangy mixtures and dried fruits/dry fruits ! The combinations are so interesting that it really doesn't get to that "Boring snack to watch my diet"!!

I decided to order the "Very Berry Strawberry" and the "Fruity Granola Bar", just to try it out! The Granola Bar which was a mixture of Oats, coconut powder, and the sweetness of apples, grapes and dehydrated peaches coated with honey, brown sugar and butter was one simple yet delicious bar! That's not exactly a meal substitute but makes up as a snack or a lunch supplement.
And the chewy dehydrated strawberries were so flavourful that i finished them off in almost 3-4 days! And not only pop them as a snack, i used them in a recipe !!!!

So here i am making a SmartEat recipe with the dried Strawberries :) As Chai-Buiscuit ( Buiscuut, as it is called :)) is a very common household evening favourite snack, our home has the Chai-Cake fever ! So baking a cake every week is mandatory :) You can add any dried fruits of your choice and make this one, the basic ingredients remains the same.


Ingredients :

Maida /All purpose flour - 1 cup
Yogurt - 1/2 cup
Butter - 1/4 cup
Baking powder - 1 tsp
Baking soda - 1/4 tsp
Powdered sugar - 1/2 cup ( Add 1/4 cup more if you have a sweet tooth )
Egg - 1
Vanilla essence - 1 tsp
Dried strawberries - a few chopped
Tutty fruity - a few
You can also add nuts if you wish to.
Nutmeg - 1/4 tsp

Recipe :

Preheat the oven to 180 degrees Celcius for 10 minutes

Grease and dust a cake tin with butter and flour and keep aside.

Sieve together Maida, Baking powder and Baking soda.

In a bowl, Beat Butter and Powdered sugar together. Now add the egg and beat again. 
Add in the yogurt and mix it all well into a nice creamy mixture. Add vanilla essence and nutmeg powder. 

Slowly add the flour mixture and mix it well with a spatula.

Lastly, add in the dried strawberries, tuttyfruits and nuts.

Put this mixture into the baking tray and bake at 180 degrees celcius for 45-50 minutes.

Remove and set aside to cool for 10 minutes before removing from the cake tin.

Now remove from the cake tin and let it cool on a wire rack.

Soft spongy cake is ready, which tastes and smells like heaven :))


Happy Baking :)


Friday, 11 April 2014

Chole Tikki

And here i write my 50th post : Blogging has surely given me lots of learning and knowledge and with all the love and support i am getting from friends,viewers and followers, i hope to continue this a long way! "Miles to go before i sleep" :)

I wanted to cook something special for my 50th post, but i couldn't help posting this one as Election ( and especially Narendra Modi) fever is ON everywhere in India! The newspaper is filled with all ( and only !!) articles about Lok Sabha Elections! Though am glad that people ( especially common man, and youth are voting to see a change in the Government ), i couldn't help but salute the PR agency of Narendra Modi who have left no stone unturned but to make us eat, sleep, dream Narendra Modi. I especially loved the hilarious "Modi Sarkaar" quotes that has been doing the rounds on social media, especially Facebook and whats-app. To quote a few favourite ones,


So, just when i picked up my Thursday morning newspaper ( which was the Voting Day in Delhi ), i saw Narendra Modi on the front page of the newspaper, and couldn't help make a quote myself for the breakfast i had cooked -
"Chole ke bina tikki hai bekaar, ab ki baar Modi Sarkaar" and i laughed out so loud myself, that i thought i had to share it with you all ! So here's bringing Chole Tikki for you...


Chole tikki, Aloo tikki, aloo chaat are the terms i learnt when i shifted to Delhi. In Mumbai, we get Ragda pattice which is made with yellow peas ( white Chana/Vatana) whereas Chole is made with chickpeas.
Now this one is again one of my Leftover Recipes, where i had Chole in the refrigerator from the earlier night ( and for some reason, me and hubby like some dishes like chole, rajma or some gravy dishes more from the earlier nights than when cooked fresh!! ). And yes, i had Boiled potatoes too! I normally boil potatoes and store in fridge. Comes in handy when you want to make a quick snack!
This is normally served with the green chutney ( corriander-mint ) and the brown chutney ( tamarind-dates) , but since i am always in a hurry in the mornings to make the tiffins, i skipped this bit. Despite that, it tasted delicious!

So Chole-tikki adorned Hubby's breakfast tiffin and no doubt, he relished it :))

Ingredients :

Potatoes : 3 medium
Corriander powder - 1 tsp
Cumin powder - 1 tsp ( you can also use cumin seeds or even ajwain to add a different taste)
Red chilli powder - 1/2 tsp
Amchur powder - 1 tsp (This made up for the tamarind-date chutney that i didn't make)
Besan/Cornflour - 1 n half tbsp ( I used besan )
Rock salt ( sendha namak ) - to taste
Oil - for frying

Other :
Cooked Chole - 1 cup
Chopped onions - 1/4 cup
Chopped tomatoes - 1/4 cup
Sev - As required
Lemon juice/ Chaat masala / Red chilli powder ( Optional ) - As required for garnishing
Corriander leaves - For garnish.

Recipe :

Boil, Peel and mash the potatoes well.
Mix in all the spice powders.
Add Salt.
Now add the Besan.
Mix everything well and make medium sized ( or as desirable ) patties of the potato mixture.
Heat oil in a pan. 
Shallow fry the Patties till crisp and golden brown.


Now add the Chole on top.

Add chopped onions and tomatoes.


Add the chutneys if you have or add sev (Baarik sev as we call it , tastes great with this )

Add Chaat masala, red chilli power and/or lemon juice if you want.

Garnish with Corriander leaves.


Relish it for breakfast with green tea, and yes, Don't forget to say , "Ab Saas-bahu khaayenge Chole-tikki aur achaar, Ab ki Baar Modi Sarkaar ) !!! ( From one of my friend Aniket Badame ).

Alternatively, you can also make these tikkis as a snack, and serve it along with chutney. Or sandwich them between breads with a layer of ketchup. Be as creative as you can ! 

Happy Cooking :)

Friday, 4 April 2014

Bhindi Sambar

Cooking is an art : As much as i appreciate when my friends call me a good cook, there are times when things go wrong ! Guess this is an everybody's kitchen story that something got burnt, something didn't turn right and some leftovers always occupy the fridge space! As much as a foodie i am, i hate to waste food and always want to find some news ways of utilising the leftovers or do some modifications and get the recipe right! 

One such day was when i was trying to make homemade ghee ( which now, am an expert at :)), and the butter refused to pop up ( from which ghee is made, we call this "LONI" in Marathi language ) from the buttermilk, despite trying all the combinations. So now i was left with tons of sweet buttermilk. Yes, it does taste good in it's natural form, but i decided to make something out of it. And my exploration led me to discover a terrific recipe of Sambar made with ButterMilk. Hubby is not much of a fan of coconut based gravies but i truly cherished it with Steamed Rice.

So Grab on your prettiest apron and wear those funky pajamas, and we are all set to enter the kitchen to make the dish of the day :)


Ingredients :

Buttermilk - 2 cups
Bhindi( Lady's finger ) - 1/4 cup (You can also add brinjals or cucumber instead of bhindi ) Chopped into small pieces
Kala Chana - 2 tbsp
Turmeric powder - 1/2 tsp
Oil - 1 tbsp ( you can also use coconut oil to add extra flavour and aroma, if you are okay with the smell of it )
Red chillies - 3
Green chillies - 2 ( i didn't have these, so my kadhi is looking a little reddish as i added 1/2 tsp of red chilli powder )
Ginger - 1 tbsp
Cumin seeds - 1tsp
Corriander seeds - 2 tsp
Hing ( Asafoetida ) a pinch
Coconut flakes - 2 tsp 
Curry leaves - a few ( Sigh! I didn't have these too...)
Mustard seeds - 1 tsp
Salt - to taste
  

Recipe :

Soak the kala chana in 1/2 cup of water.

Heat a little oil in a pan and fry the bhindi ( they shouldn't be too crisp, fry it just till they start browning).

Add turmeric and salt to the buttermilk. ( In case you don't have buttermilk, use yogurt )

In a grinder, add the soaked chana, ginger, coconut flakes, green chillies, red chillies and corriander seeds and grind it to a smooth mixture. Add a little water if necessary.

Heat oil in a pan, add Asafoetida, mustard seeds and cumin seeds. When they crackle, add this ground mixture to it and saute for a minute.

Now add the yogurt mixture and let it come to a boil.

Now add the fried bhindis and let it simmer on low flame till it thickens.

You can garnish it with corriander leaves. 
Serve with Steamed rice and Papad !

Happy Cooking :)