Showing posts with label Baking. Show all posts

Friday, 15 May 2015

Wafola : Cabbage Cake

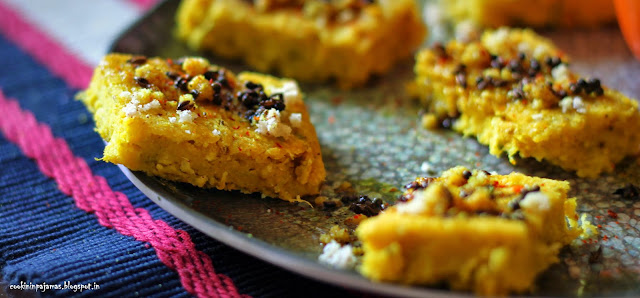
When i sent this picture to my sister in law in US, she said "Looks like dhokla"!! Well, yes, it surely looks like one, but this is more denser. Moreover, though the name suggests it to be steamed (Waaf in Marathi means Steam), this one is baked. Hence i think it is known as a Cabbage cake.


The recipe was new to me, i had not really heard about this one! We make "Kobichya vadya" with almost similar ingredients but we steam it. The tempering and garnishing remains the same. Here, in the cookbook of "The essential Marathi cookbook", this cake is baked. The author, Ms. Kaumudi Marathe, says - "During the years of food rationing around the Second World War, when semolina and refined wheat flour were hard to come by, gram flour based snacks were a great alternative. Traditionally, wafola was cooked over an open charcoal fire but these days, a conventional oven works just fine".


Wafolas make a perfect tea-time snack or a good breakfast dish too! What more? It is baked!!! That makes it super healthy too :) The addition of tempering on top takes the dish to a completely new level of flavours!!


Ingredients:

Green cabbage : 1 n 1/4 cup grated
Ginger - 1/2 inch piece grated or made into a paste
Turmeric powder - 1/4 tsp
Salt - to taste
Green chillies - 2 (The recipe said sliced, but i prefer making a paste in a mortar and pestle)
Ajwain - 1/2 tsp
Sugar - 1/4 tsp
Oil - 2 tbsp
Asafoetida - a pinch
Besan (gram flour) - 1 cup
Soda bicarbonate - 1/4 tsp (optional)
1/8 cup yogurt + 1/4 cup warm water

To garnish:
Ghee - 1/2 tbsp
Mustard seeds - 1/2 tsp
Turmeric powder - 1/4 tsp
Red chilli powder - 1/4 tsp
Grated fresh coconut - to garnish
Corriander leaves - to garnish
Lime juice - to taste


Recipe:

Mix together cabbage, green chilli paste, ginger paste, salt, turmeric, ajwain and sugar in a bowl.

Heat 1 tbsp oil and add asafoetida to it. Mix this in the cabbage mixture.

Slowly add the gram flour and keep mixing it well.

Add the soda bicarbonate in the yogurt mixture and add this to the cabbage mixture stirring well.

If the mixture is too thick, add water as required to make the consistency as thin as a cake batter.

Grease a 9 inch baking tray with 1/2 tbsp oil. Put the batter in the baking tin.

Preheat oven to 180 degrees Celsius. Bake the wafola for about 20 minutes. Now brush a little oil on top and bake again for another 10 minutes or till the toothpick comes out clean.

Remove from the oven and allow to cool for about 10 minutes. Now cut the cake into squares or as desired shape.

Heat 1 tbsp oil in a wok for garnishing. Add mustard seeds and let them pop. Then add the turmeric and chilli powder. Stir well and pour over the cut square cakes. Sprinkle coconut and corriander leaves on top.

Add lime juice if and as desired.

Tastes best when served with green chutney - Corriander chutney, mint chutney but i served it with Peru chi chutney (Guava chutney). I will upload the recipe in next post!


Serve the wafolas warm, and am sure they will be relished by everyone in the family :)

Happy Cooking! :)


Tuesday, 6 January 2015

Rum cake

I know i am late in wishing you all! A very Happy New Year to all of you. Thank you for all the support you gave reading my posts last year and i hope there is more and more of cooking and blogging this year than the last :) Not only cooking and blogging, but i have seen some tremendous talented fellow bloggers, or should i say multi-talented fellow bloggers? Some paint, some write poems, some teach and some craft...So, i wish success to all of you in whatever you do. It feels great to see immense amount of "art" and "talent" everywhere around. Keep it going.


New Year's this time was cold, foggy and windy. Coping up with the season, i thought of indulging in some warm, moist, soft Rum cake. And i must say, this one was baked to perfection!!! It turned out so well that it was finished in almost a day (Yeah, it was just the two of us, but it was "holiday-eating" season :)) This time i forgot to pre-soak the fruits well in advance, as i already had my hands full with pet-sitting, you can see it here...


Some do soak almost a month in advance, the last year (2013 Christmas Cake ) i had soaked 15 days in advance but this year, i only soaked it for 3 days before making the cake and i guess, it wasn't bad either. A day in advance is good too, but the more the better. I have mentioned this before that me and hubby usually like normal cakes (ones without icing), so this one was served just as it is. But you can add any toppings/icing of your choice if you wish.


Recipe adapted from : Anshu-My Mom's recipes

Ingredients:

To soak :
1 cup of any mixed nuts/dry fruits of your choice - I soaked raisins, orange zest, cashews, dried dark strawberries and tutti fruiti.
1/4 cup Rum 

For the cake:
Rum - 1/4 cup
Maida - 1 2/3 cup
Baking powder - 3/4 tsp
Baking soda - 1/4 tsp
Cocoa powder - 1/3 cup
Sugar - 1 1/4 cup
Egg - 1
Butter - a little less than 3/4 cup
Soaked nuts/dry fruits

Recipe:

Soak the nuts/dry fruits in rum and keep in air tight container. If soaking for days, then stir and mix it well once a day.

Grease and dust a baking pan and keep aside.

Powder the sugar in mixer/grinder.

Sieve together Maida, baking soda, baking powder and cocoa powder.

Add the powdered sugar to it. Mix well with a spatula to make sure no lumps exist.

Boil 1 cup of water and add the rum to it. Also add the soaked nuts. Mix well. Let this come to room temperature before adding anything.

Melt butter in microwave and keep aside. Do not let the butter solidify again and make sure you don't add hot/warm butter to anything. Let it come to room temperature.

Beat egg in a bowl. Add butter and beat again.

Add this to the rum mixture. 

Now slowly add the dry Maida mixture to this and mix. Do not over-mix. Gently mix till everything mixes well together.

Pour this mixture in the baking pan and bake in a pre-heated oven at 180 degree Celsius for about 40-45 minutes. Start checking after 40 minutes if the toothpick is coming out clean. If yes, remove from the oven and let it cool.


This cake comes out a perfect texture, colour and taste. Don't miss trying this one :) I have dusted a little powdered sugar on top (which is completely optional).

Happy Cooking! Happy Blogging! And Happy New Year once again :)


Friday, 16 May 2014

Chole Kulcha Pizza Style !

With Birizza making news in the market, and getting all sorts of mixed reviews, fusion dishes are making their way in the kitchen. Birizza is a new dish launched by American restaurant chain Pizza Hut, wherein biryani cooked on a tava is sealed with a baked pizza topped with olive. To be honest, i haven't tried it yet so i have nothing to say about it. But i surely tried this fusion dish of serving Chole kulche in pizza style from the recipe of Chef Harpal Singh.


My Dad always says, " Be a Roman in Rome" which explains the fact that one should adapt to the surroundings and be flexible to whatever comes your way. I always apply this teaching of his when it comes to food and travel.As much as i miss eating Mumbai food in Delhi, i love the rich, masaaledar (full of masalas ), spicy, chatpata khana here. Chole Kulcha is to Delhi what Vada Paav is for mumbai. It is one of the most popular Street food dishes and it does taste terrific! As much as i cook chole often here, chole chaat is one dish i love to snack in too. Just boil the soaked chana, add in chopped tomatoes, onions, green chillies, some corriander leaves and some salt. Makes for a great evening snack. 

The same chole chaat served on a readymade pizza bread ( or we even get kulcha breads here ) adds to the presentation and tastes crispy and flavourful too.

Ingredients :

Kulcha bread/Pizza Bread - 1
Chickpeas ( White chana/chole ) - 1 cup ( Soaked overnight )
Onion - 1 medium ( chopped finely )
Tomato - 1 medium ( chopped finely )
Chaat masala - 1/2 tsp
Green chilli - 1 ( Chopped finely )
Red chilli powder - 1/2 tsp ( adjust according to taste )
Processed chesse/ Pizza cheese/ Mozarella - to sprinkle ( as required )
Salt - to taste
Butter - To apply on the pizza bread  


Recipe :

Pressure cook the chickpeas till they are soft ( took me about 3 whistles ). What i normally do is add about 1/4 tsp of turmeric ( haldi ) and 1/4 tsp of red chilli powder and 1/4 tsp of garam masala to the water while pressure cooking the chole. This way, i believe, the flavours merge in well. But it is optional. Let it cool and drain the water ( You can use this water to cook any curry later on, so refrigerate this and don't throw it away )

Cut the Kulcha bread or pizza bread into 4 portions. Now heat a tava and place them on it. Brush a little butter on top side of the bread evenly.
Add a little oil to the tava, and toast the bread till it becomes little brown and crisp ( Make sure not to brown it too much or else the bread will become hard )


Take the boiled chickpeas in a bowl, add the chopped tomatoes, onions and green chillies. Mix in some red chilli powder ( If required, according to taste ), the chaat masala and salt. Mix the mixture well. and divide it equally on top of the 4 portions of bread. 

Now add the grated cheese. Preheat oven to 180 degree celcius for 5 minutes. Grease a baking tray with some oil and place the 4 slices of pizza bread on top. Bake at 180 degree celcius till the cheese melts ( took me about 5 minutes ).

Sprinkle some red chilli powder on top and serve along with ketchup or as it is.


Easy- snack recipe and one wholesome too ! 

Happy Cooking :)


Sunday, 20 April 2014

Fruity Sponge Cake

Very Berry Healthy : A Great Day begins with a Healthy yet Tasty breakfast, but is more good when you have a Healthy snack to munch on when you have that in-between hunger cravings! Me and hubby get those a lot! And instead of having the regular buiscuits and chips, we decided to opt for something healthier and Smarteats came right in ! 
http://smarteats.in/ 
They have some really tasty wholesome snacks which you can carry in your tiffin or the packaging comes so neat with a seal-zip bag that you can carry it anywhere just like that ! They have Diet snacks, Cookies, Granola Bars, Tangy mixtures and dried fruits/dry fruits ! The combinations are so interesting that it really doesn't get to that "Boring snack to watch my diet"!!

I decided to order the "Very Berry Strawberry" and the "Fruity Granola Bar", just to try it out! The Granola Bar which was a mixture of Oats, coconut powder, and the sweetness of apples, grapes and dehydrated peaches coated with honey, brown sugar and butter was one simple yet delicious bar! That's not exactly a meal substitute but makes up as a snack or a lunch supplement.
And the chewy dehydrated strawberries were so flavourful that i finished them off in almost 3-4 days! And not only pop them as a snack, i used them in a recipe !!!!

So here i am making a SmartEat recipe with the dried Strawberries :) As Chai-Buiscuit ( Buiscuut, as it is called :)) is a very common household evening favourite snack, our home has the Chai-Cake fever ! So baking a cake every week is mandatory :) You can add any dried fruits of your choice and make this one, the basic ingredients remains the same.


Ingredients :

Maida /All purpose flour - 1 cup
Yogurt - 1/2 cup
Butter - 1/4 cup
Baking powder - 1 tsp
Baking soda - 1/4 tsp
Powdered sugar - 1/2 cup ( Add 1/4 cup more if you have a sweet tooth )
Egg - 1
Vanilla essence - 1 tsp
Dried strawberries - a few chopped
Tutty fruity - a few
You can also add nuts if you wish to.
Nutmeg - 1/4 tsp

Recipe :

Preheat the oven to 180 degrees Celcius for 10 minutes

Grease and dust a cake tin with butter and flour and keep aside.

Sieve together Maida, Baking powder and Baking soda.

In a bowl, Beat Butter and Powdered sugar together. Now add the egg and beat again. 
Add in the yogurt and mix it all well into a nice creamy mixture. Add vanilla essence and nutmeg powder. 

Slowly add the flour mixture and mix it well with a spatula.

Lastly, add in the dried strawberries, tuttyfruits and nuts.

Put this mixture into the baking tray and bake at 180 degrees celcius for 45-50 minutes.

Remove and set aside to cool for 10 minutes before removing from the cake tin.

Now remove from the cake tin and let it cool on a wire rack.

Soft spongy cake is ready, which tastes and smells like heaven :))


Happy Baking :)


Friday, 28 February 2014

Eggless Banana Walnut Muffins

Breakfast Blues : Every evening, i always have to sit and think what to pack in tiffin for breakfast the next day to give hubby dearest at work. The regular recipes of Upma, Poha, Idli, Dosa etc takes a toll sometimes. Yes, egg is always an option ! I would like to mention about this friend of mine who is called "Anda Iyer"... seems, eggs are his life! He can't do without them ! But it's interesting to see his egg-recipes in the forum, always a different one, and the tempting pictures too :)

With "Anda Iyer " Rajiv :)


So, it was one of those days when i had Bananas at hand, but no eggs and no butter. I decided to make some Banana muffins without egg, and they turned out superrrr soft and spongy. I had made the Yogurt Cake earlier with oil,( http://cookininpajamas.blogspot.in/2013/12/yogurt-cake.html ) but i had added an egg then. This time i tried making these with only oil. I did use Olive oil, but you can use regular vegetable oil too. Olive oil of course gives it a good aroma and a rich taste ! This one is a simple-easy to make muffins recipe! Packed in tiffin for breakfast, hubby loved them with a mug of coffee :)


You can otherwise store them in an air tight container in refrigerator for about 2-3 days. Warm in a microwave just before eating. They taste as fresh as ever :))


Ingredients :

Maida ( All purpose flour ) - 3/4 cup
Powdered sugar - 1/2 cup ( Put little less if you don't like it too sweet, adjust according to taste )
Vanilla essence - 1/2 tsp
Baking soda - 1/2 tsp
Baking powder - 1/2 tsp
Walnuts - 1/4 cup
Olive oil - 1/4 cup ( or any other vegetable oil )
Bananas - 2 ( medium size)

Recipe :

Mash the bananas in a bowl with hand or a fork to make it into a paste.
Now add the oil and mix well.
Add the sugar and vanilla extract, Mix it all well and keep aside.
Chop the walnuts.
Sieve the Flour, Baking powder and baking soda together twice.
Now Add the banana mixture to the flour mixture and mix it all well. Don't beat/whisk...Just mix everything together with a spatula.
Add 1/2 of the chopped walnuts into the batter and mix again.
Preheat oven to 180 degree Celsius. Line a muffin tray with muffin liners or else grease it with oil and dust with flour. 
Fill the batter till 1/2 or 3/4th into the mould ( Don't fill it to the full, as it will raise and the shape will get distorted ). 
Now Bake the muffins for about 30 minutes or till upper portion gets brown. I baked for 5 minutes more to get that fine brown colour. Check after 25 minutes with inserting a toothpick. If it comes out clean, means its done!
Let them cool on a rack for about 15-20 minutes. Then remove and let them cool completely.


These Tempting muffins are ready.... Have one right there!!!:)


If you have butter at hand, then you can try this recipe which i had made a few days back...This one is easy too, and you can replace the cashews with walnuts or any nuts of your choice but i would say, the walnuts are the USP of these muffins !!!


Banana Cashew Muffins :

Ingredients :

Bananas - 4 ( of medium size )
Vanilla essence - 1/2 tsp
Maida ( All purpose flour ) - 1 n half cup
Melted Butter - 1/3 cup
Baking soda - 1 tsp
Baking powder - 1 tsp
Cashews - a few ( 1/4 cup )
Salt - a pinch

Recipe :

Chop the cashews.
Mash Bananas with a fork or with hand and keep aside.
Sieve the flour, baking soda and baking powder together twice.
Take butter in a bowl and add sugar and whisk till it turns creamy.
Now add the mashed bananas and vanilla essence.
Slowly add the flour mixture and mix well.
Add about 1/2 of the chopped cashews into the batter.
Preheat oven to 190 degree Celsius. Line a muffin tray with muffin liners or grease with oil/butter and dust with Maida ( All purpose flour )
Now fill the muffin moulds with batter, fill it only to half or 3/4th.
Bake for abut 20 minutes or till the toothpick inserted comes out clean. If not, bake for more time and check every 5 minutes.
Happy Baking :)

Linking this recipe to :
http://www.amummytoo.co.uk/2014/06/recipeoftheweek-21-27-june/

Monday, 10 February 2014

Cashew Muffins

I am the Baker : Baking has become a weekly affair at our home now !!! Infact, just last week when i went past a pastry shop, i had this urge to buy and eat one!!! But, the baker inside me told myself, that i might as well go home, bake some ( not to forget the freshhhh aroma of a cake baking that fills the home...Oooh...laaaa...laaaaa ) and cherish it with a cup of coffee :))) 

I am simply in love with baking... As mentioned earlier, me or hubby dearest are not much fan of icings or any toppings on cake... we like pure fresh spongy cake!!! And i had tried the chocolate, tutty-fruity, and rum-n-raisin cake before !!!( Recipes uploaded before )
This time i thought of trying my hand at muffins with cashews ( Cashews being hubby's favourite dry-nut ). I had a lot of them at home ... Yes, people generally eat a lot of dry fruits and nuts during winters to keep warm, and this time when my mother came to Delhi, she got me a whole big packet of all the raisins, almonds, figs, cashew nuts, and pistachios !!!

These muffins are so easy to bake, you can make them on regular basis changing the cashew powder to almonds or any dry fruit of your choice.


Ingredients :

(Makes 8-9 muffins )

All purpose flour( Maida) - 1 cup
Sugar - 3/4 cup ( If using powdered sugar, adjust according to taste )
Butter - 2.5 tbsp
Cashew powder - 1/4 cup ( Grind the cashews in mixer for a fine powder )
Egg - 1
Baking powder - 1 tsp
Baking soda - 1/4 tsp
Salt - 1/4 tsp
Milk - 1/2 cup
Vanilla essence - 1 tsp


Recipe :

Sieve Maida, Baking powder, Baking soda and salt together. Sieve it one more time and set aside.
Beat Cashew powder and butter together in another bowl.
Now add the egg and beat again.
Now add the sugar and mix it all well.
Mix in the vanilla essence.
Add the flour mixture and milk alternatively to cashew-butter mixture. Add slowly and mix it all well, so that you get a fine smooth texture.

You can add some cashew chopped pieces in the mixture or on top ( after setting in the muffin tray ). You can even add tutty-fruity , if you like.

Grease and dust the muffin tray with butter and Maida. Now put the muffin mixture into the the tray. ( Fill it only till 1/2 or 3/4 th , as it will tend to rise up when it bakes ).

Preheat oven to 180 degrees for 15 minutes. Bake the muffins at 180 degrees for around 30-35 minutes or till you see a browning on top!!!

So, how about having them with a cuppa coffee???


Happy Baking :)

Tuesday, 31 December 2013

Yogurt Cake

Its New Years!!!! : What better way to celebrate New Years than to bake a cake ?? :) After all the partying and dancing, you need a quick-bake recipe, so that you don't have to spend too much time in the kitchen. But yes, start your new years with a sweet and we wish you have a great, bright sweet new year ahead :))

Lets bake a cake with ingredients that you normally have in the kitchen!!! Egg, yogurt, oil, ghee...These are always there in the kitchen...
Baking a cake with yogurt surely seems new, but trust me, the aroma is so inviting and the cake turns out so soft and spongy that i am sure it will be finished in a jiffy...


Ingredients :

Maida /All purpose flour - 1 cup
Baking powder - 1 tsp
Baking soda - 1/4 tsp
Yogurt - Full cream thick yogurt - 1/2 cup
Oil - ( preferred olive oil ) - 5 tbsp or u can use 2 tbsp butter
If you don't have both, add 3 tbsp ghee.
Sugar - 1/2 cup
Egg - 1
Vanilla essence - 1 tsp
Tutty fruity - a few ( you can even add dry fruits of your choice if u wish)
Nutmeg - 1/4 tsp


Recipe :

Sieve together twice Maida, baking soda and baking powder and keep aside.

Grease and dust a cake tin with butter and flour respectively.

Preheat the oven to 180 degrees for 10-15 minutes.

Beat oil and sugar together. Add Egg and beat it more. Now add the yogurt.
Add vanilla essence and nutmeg powder and then add the flour mixture slowly. Mix it all well with spatula.

Once the batter is ready, pour into the cake tin and bake at 180 degrees for 50 minutes. If you see the top is turning dark brown, then cover it with a foil towards the end ( after 40 minutes - only if it is turning dark ) and bake again.

Once done, remove and cool in the tin for 10 minutes.

Now remove from the tin and let it cool completely.


You can even serve this with a scoop of ice cream :)

Happy Baking!!!

Cookin in Pajamas team wishes you all a very happy New year...Keep cooking and keep eating!!! :)


Thursday, 26 December 2013

Christmas Cake

"Jingle all the way" : Its the month of Santa, Christmas tree, candles, decorations with stars and lights and lots of ornaments. People even decorate the outside of their homes with snowmen, sleighs and other Christmas figures. And the age old tradition of hanging a stocking and waiting for Santa ( Saint Nicolas ) to get us the wanted gifts...

My brother who stays in US, always decorates his home with Christmas tree and lighting his backyard and home with candles and lights..Here is how he welcomed Christmas this year... It looks terrific, doesn't it?


Christmas celebrations are in full swing in India just as abroad. We see a lot of people hosting Christmas parties, markets selling Santa's red and white caps and even Christmas trees. This year, we got the tiny Santas and candy cane and some ornaments ( just to decorate my cake :))

And so not to forget, It is also the month to bake cakes, cookies and biscottis :)
Its such a pleasant feeling when your kitchen has aroma of the freshly baked super spongy cake...This year i wanted to try my hand at baking the Christmas plum cake, and hence i soaked in the dry fruits almost 15 days before in rum. I have added Cherries, different coloured tutty-fruity, cashews, raisins and black raisins. You can add any dry fruits of your choice like walnuts, almonds, prunes, dates, orange zest etc. but raisins are a must!!! After all it's rum and raisin cake :) For people, who like it without alcohol, you can just boil the dry fruits with water and little sugar for 5 minutes at the time of baking the cake. If you don't like rum, you can even soak the fruits in beer or red wine or a mixture of wine, rum and beer. Anything tastes just great.
Here is how my soaked fruits looked like :


Every day is an occasion : The cake turned out so yummy that it was finished by hubby and his friends ( who had come over for Christmas) within hours! I feel i shouldn't wait for Christmas to bake and eat this one...Any day is a celebration and i am surely going to bake this one again :)

Recipe adapted from : Swapna Mickey


Ingredients :

Mixed dry fruits : 350 gms ( i used cherries, different coloured tutty-fruity, cashews, raisins, and black raisins )
Rum - 1/2 cup ( Can also add brandy, wine or beer )
Butter - 3 tbsp ( heaped )
Ghee - 3 tbsp ( heaped )
Powdered sugar - 150 gms
Eggs - 2
Vanilla essence - 1 tsp
Sugar - 2 tbsp ( to caramelize )
All purpose flour/ Maida - 120 gms
Baking powder - 1/2 tsp
Baking soda - 1/4 tsp
Spice powder - 1/2 tsp ( i used my chai masala powder - Recipe uploaded earlier - You can also use mix of clove, cinnamon and nutmeg powder )
Milk - 1/8 cup
Lime juice - 1 tbsp
Sugar - 2 tbsp


Recipe :

Soak the chopped dry fruits in Rum as early as you can/want. I did it for 15 days, but some even do it for months or a year in advance.( the more u soak, the tastier it is). Soak it in a clean , dry glass bottle or air tight container. Make sure you stir the fruits once a day. Soak them for minimum 1 week in advance.

On the day of baking the cake, transfer these dry fruits into a steamer and steam them for 5 minutes. I did it in idli maker in microwave for 5 minutes. Remove the lid and allow the fruits to cool.

The most important thing to make a plum cake is to caramelize the sugar. It is not that tough at all ! Just take 2 tbsp sugar in a pan and heat it stirring continuously till it becomes dark brown. Meanwhile, boil 1/2 cup of water and keep. Now add this hot water to the sugar. Keep stirring till it becomes thick. Keep it aside.

Add 2 tbsp sugar to 1 tbsp lemon juice and keep aside.

Sieve together ( preferably twice ) maida, baking soda, baking powder and spice powder. Toss in the steamed and cooled dry fruits into this flour, so that the dry fruits are coated properly. This is just to avoid the dry fruits from falling to the bottom of the cake when baking.

Preheat the oven to 180 degrees for minimum 15 minutes.

Beat Butter, Ghee and sugar together till light and fluffy. Add eggs one by one and keep beating. Now add the vanilla essence and caramel syrup and mix well. Now add the flour-dry fruit mixture and milk alternatively, finishing with the flour mixture. Mix it all well with a spatula. Lastly, add the lemon juice mixture.

Grease and Dust the cake tin with butter and flour respectively. Add in the cake mixture and bake the cake at 180 degrees for 1 hour 15 minutes. Check after an hour if it's done and add more time if required.

Let it cool for 10 minutes in the tin after removing from the oven on a wire rack. Now remove from the cake tin and let it cool completely.

Store in an air tight container. You can also pour in rum on top while serving or inject rum inside the cake with a syringe :) Tastes yummm....


Happy Baking :)))


Saturday, 7 December 2013

Eggless Chocolate nut cake : Cake-mania

Cakes, Cakes and more cakes : One of the reasons we got microwave this Diwali was to bake!!! Me and Hubby both love homemade cakes... we are not much fans of icing and creamy layered cakes but the spongy fluffy ones, just which can be eaten with tea or coffee or as a snack... Or can even be a dessert with an addition of ice cream.... :)
I had learnt cake making in my college days of Home-Science, and also taken one baking lesson ( on insistence of my friend Ayuushi Agarwal, and thoroughly enjoyed it too ), but that was long back ! Since almost a year i had not baked any cake, and making one was making me nervous... I hope i get all the ingredients right... I hope i don't make it too buttery... I hope i don't make it too powdery... With all these questions in mind, i still got all the ingredients ready and decided to give it a go with a simple egg-less chocolate spongy cake topped with dry fruits and nuts !
And this is how it turned out....


Yes, as much as it looks yummy, it tasted great too... why don't you make one and give it a try??


Ingredients :

All purpose flour ( maida ) - 100 gms 
Cocoa powder - 2 tbsp
Butter - 2 tbsp ( heaped )
Soda water - 1/2 cup
Condensed milk ( milkmaid ) - 1/2 tin ( 1 tin is 200 gms available in market, so calculate accordingly and keep the rest in freezer for future use )
Powdered sugar - 1 tsp
Soda bicarb ( Baking soda ) - 1/2 tsp ( store in fridge when opened )
Baking powder - 1/2 tsp ( store in fridge when opened )
Vanilla essence - 1/2 tsp ( powder or liquid )

Method :

Preheat oven at 180 degrees. 
Grease a cake tin or any baking dish with butter and dust it with flour ( make sure to remove the extra flour while dusting, otherwise the cake tends to get dry)
Sieve flour, cocoa powder, baking soda and baking powder together for 2-3 times so it is very fine.
Beat Butter and condensed milk together... Add sugar and beat again till its fluffy.
Add soda water and dry ingredients ( flour mixture ) alternatively and keep mixing.
After adding soda water , don't keep the mixture out for too long. Put it immediately in the oven.
Pour the batter into the greased cake tin and add the nuts on top. You can even mix the nuts in the batter, but they tend to sink in. Adding them on top gives it an aesthetic appeal too :)
Bake at 180 degrees for 25-30 minutes approx or till it's done. Check with putting a knife in the cake , if it comes out clean it's done. or else bake for some more time :)

Your yummyliscious chocolate delight is ready !!!!


Happy Baking :)