Tuesday, 31 March 2015

Anokhi kheer : Royal cuisine

I always have a conflict in my mind over "Tradition v/s Modern". I don't mean here in the sense of clothes, fashion or freedom but the cultures and values that that make us who we are. In the age of modernization, the originality is somewhere lost and we are losing connection with our roots. I am not being judgmental here or biased, but i would love to see kids play outdoors than play X-boxes and Playstations. I would love to see them having their food hearing the birds chirp or watching the sky than watching Doremon's and Chota Bhim. This definitely doesn't mean you are raising a Tarzan, but life's teachings are the best than those learnt with technology. A very dear friend of mine from Spain closed his Facebook account recently and while we chatted on email, he gave me a very good reason on "Going natural". He said, we are so dependent on "Apps" that we have lost our tendency of natural instincts. No doubt, we rely so much of G maps (For some reason, i find those even more confusing :)) when we have a tendency to find the places ourselves.


On the other hand, I experienced a "hands-on" example of "Benefits of technology" recently, when my Cylinder gas finished all of a sudden on Saturday night. It wouldn't have been so much of a worry if we had just two mouths to feed (Me and Hubby). But here we had three 4-legged paws with us (My pet sitting clients) who ate home-cooked meals. So, the microwave came to the rescue. Rice, chicken and veggies - everything went straight inside and my pet-paws licked their bowls clean with wagging tails :) If not for microwave, i would have had to scratch brains what to feed them. (Of course, there is always an option of raw veggies, fruits, curd etc but some paw kids won't taste food without chicken :))

So, the conflict always remains but somehow i am a little inclined towards the traditional, old-age, historical stuff. With food too, i love to dig out old recipes, read how it's traditionally cooked and try them out. This curiosity has definitely got me hooked to this "Lost recipes" program on Epic channel. In one of the episodes, they covered all about the Hyderabadi cuisine. Normally they show 3 recipes in one episode, so one of the recipes in that was Anokhi Kheer. The recipe sounded so simple, that i at once, tried it and it tastes delicious. 


The recipe was shown cooked by Mrs. Geeta Devi who belongs to a family that worked closely with Nizams and thus has access to all the royal recipes, which are published in her book : The Jewels of Nizam - Recipes from the Khansamas of Hyderabad. Geeta Devi has been associated with the Golkonda Hotel, Hyderabad as a food consultant, and hence i believe this kheer is available at their restaurant. She describes her expertise as "Deccani cuisine" and dug into the history of Nizam cuisine to find out the traditional recipes and their methods of cooking. Cooking during those times was mostly subjected to availability of raw materials, hence this Anokhi kheer came into existence.

Anokhi kheer she says basically would have been influenced from Afganisthan and is made of dry fruits and onion. Yes, a kheer made of ONION!!!!This kheer was also eaten by poor men, as onions during those days were cheap and would be a part of the ration that one got. This kheer was eaten during summer time as onions lower body temperature. In winters, "Gobi ki kheer" or "lasan ki kheer" was made to keep the body warm. 

Ingredients:

In the program, she used 100 gm onions for 2 litres of milk, but i made it into half quantity. 

Milk - 1 litre (I used full cream, but you can use toned or skimmed milk too)
Onions - 50 gms (about 1/3 cup)
Cardamom - 8-10
Almonds - 1/4 cup (Add more according to choice)
Pistachios - 1/4 cup (Add more according to choice)
Sugar - I added about 5-6 tsp (Adjust according to taste)


Recipe:

Boil the milk and simmer on low flame till it starts to thicken.

Meanwhile, slice onions lengthwise and wash them about 4-5 times to remove the bitterness or spiciness if any (Depends on the kind of onion you are using).

Soak the almonds in water and when soft, chop them lengthwise or crush them lightly in a mortar and pestle.

Also chop the pistachios lengthwise.

Remove cardamom seeds and make them in a powder in a mortar and pestle.

Once the milk has reduced to half, add the onions. 

Keep stirring at intervals and scrape the cream from the sides.

Once it turns pinkish, add the cardamom powder.

Stir in sugar and mix well. Simmer till sugar dissolves and milk reduces little more.

Add half of the dry fruits and mix well.

While serving, add rest of the dry fruits on top to garnish.


Anokhi kheer is ready :)

By the way, for all my friends who don't know Hindi, Anokhi means "Different or unique". An onion kheer is definitely unique, isn't it?

I have purposely kept the consistency a little thin, but you can thicken it as much as you want. Just make sure it shouldn't be too thick like a halwa.

Happy Cooking :)


Monday, 23 March 2015

A bowl of goodness

Salad is a very important part of a diet. Every nutritionist or a dietitian would advise you to include raw vegetables, fresh fruits and nuts in your diet. A very interesting book that i am reading now by the name of "Curry" talks about how food culture evolved in India. Though there was a significant influence of the Portuguese who invaded the southwest India, the Great Mughals who invaded the North of India and the British Raj who ruled us, the importance of "Ayurveda" and "vegetarianism" was very much rooted in the country who preferred and ate "Saatvik" food. Saatvik food is basically "pure food" - that which doesn't impure your body, and is hence able to improve your thoughts making you more kind, generous and calm. It was also believed that growing vegetables or fruits and eating them raw was much more beneficial, as it captures the essence of the soil and water and connects you to your roots.


So, a normal saatvik diet would consist of seasonal foods, fruits, vegetables, oil, dairy products, nuts, whole grains and legumes - basically a non-meat diet. It becomes a little difficult to follow a saatvik diet when we are overpowered with the cravings of eating "masaaledaar" and "lajjatdaar" food :) But to maintain a balance, having a salad is always helpful. Even if one or two fruits a day, and a simple cut vegetable salad is added to our meals, it balances out all the sinful cravings that we indulge into otherwise. 

Normally, i always have a koshimbir in our meal. Some of the koshimbir posts from before : Kakdichi koshimbir, Tomato carrot koshimbir, Fruit salad .


But at times, i make a wholesome salad which serves as a complete meal. Here i have added boiled peanuts and boiled chana, but you can get as creative and replace/add/reduce the nuts and other ingredients according to personal preference.


Ingredients:

Peanuts - 1/2 cup
Kala chana (Black chickpea) - 1/2 cup
Lettuce leaves - to garnish ( or you can even chop them and add to the salad)
Walnuts - 3-4 chopped (optional)
Almonds - 3-4 chopped (optional)
Onion - 1 small chopped
Tomato - 1 small chopped
Green chilli - 1-2 chopped
Red chilli flakes - to taste (Add red chilli powder if you don't have flakes)
Oregano - to taste
Black salt - to taste
Pepper - to taste
Lime juice (optional) - 1/2 tsp
Pomegranate - 1/4 cup (optional)


Recipe:

Wash the black chana and soak it overnight.

Drain the water, pat them dry and keep it in air tight container at room temperature or in refrigerator if you want them to sprout. 

Even if they are not sprouted, they taste great.

Wash the peanuts.

Boil the black chana and peanuts till they become soft. The peanuts will start losing colour and become pale. Alternatively, you can also pressure cook them for one whistle.

In a mixing bowl, mix the boiled chana and peanuts. Add the chopped tomatoes, onions, green chillies, salt, pepper, pomegranate, walnuts, almonds and mix it all well.

Line the serving bowl with washed lettuce leaves. Add the salad into the bowl. Now sprinkle oregano and chilli flakes and finish it with some lemon juice.

Mix it all well and enjoy the bowl of goodness as one wholesome nutritious meal.


Happy Cooking :)


Friday, 13 March 2015

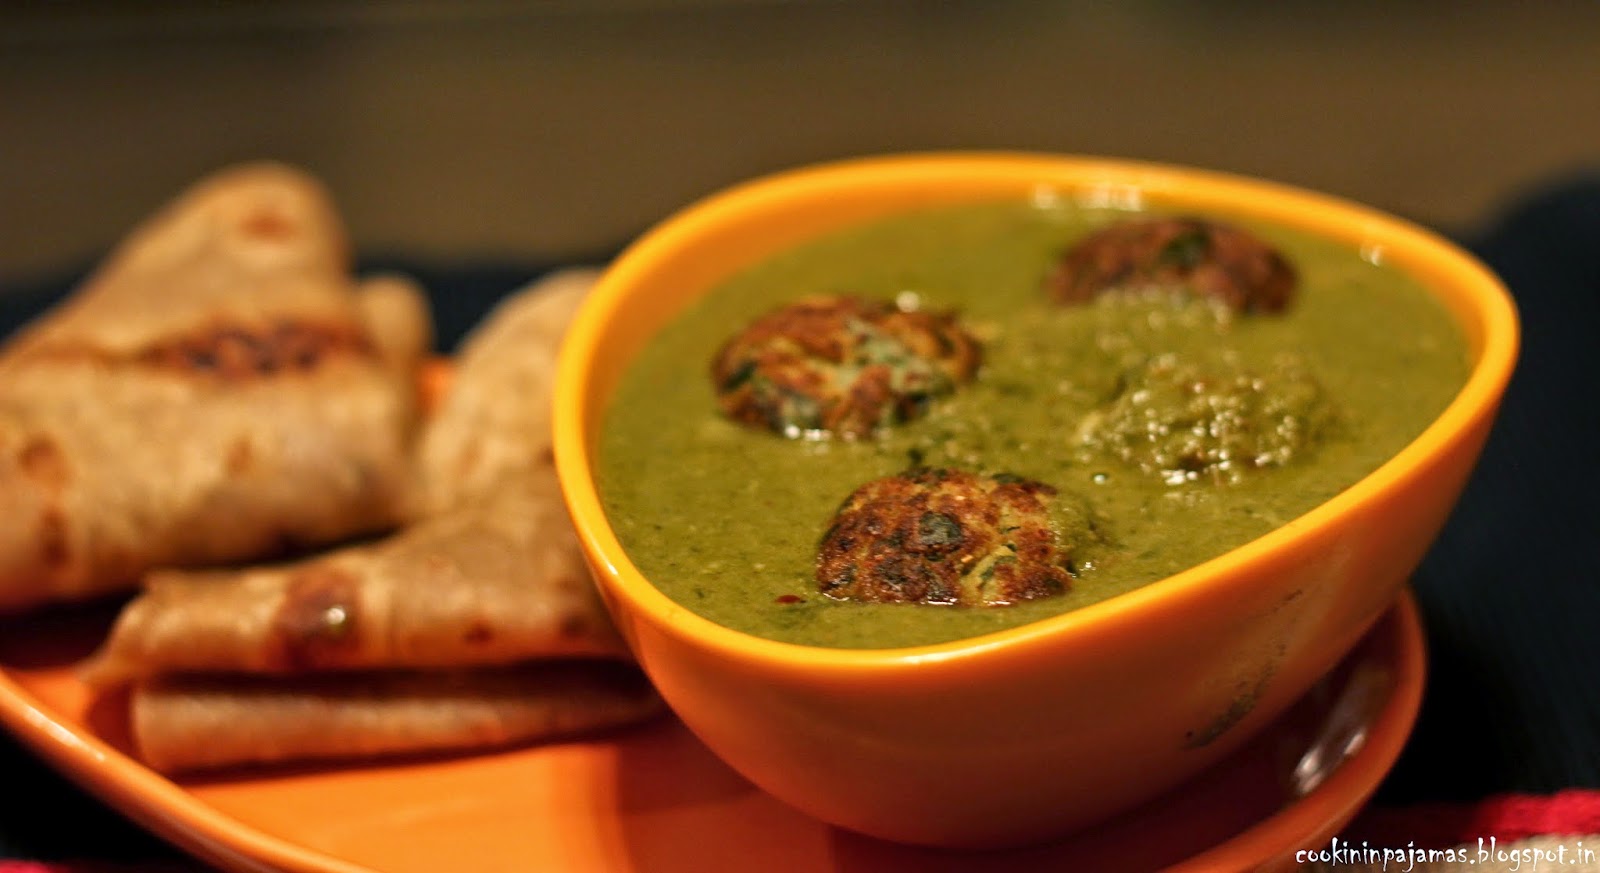
Palak Kofta Curry

The word Kofta is a Persian word and basically is a meatball, i.e a ball made of minced meat. There are so many different variations of koftas as the dish is very flexible and one can adjust the ingredients and spices according to preference. A kofta can be grilled, baked, fried or roasted, the only important thing to be observed is that the meat is properly grinded to a smooth paste. Traditionally spices like nutmeg and/or cardamom were always added to koftas, but one can alter the spices and instead add onions, garlic, corriander, red chilli powder etc. A kofta is basically a round ball, but creativity comes out best in the kitchen when some shape it like a flat patty or elongated ones likes cigar on a skewer (Mostly served in Middle east).


In India, we commonly come across vegetable koftas but i have even seen some serving seafood koftas. To make the koftas a little more dense, sometimes rice, or wheat or maida or even besan is added. Whichever way, koftas taste absolutely great and make a perfect snack when served dry or a perfect meal when served as a curry with roti or rice. Here i wanted to go green, and hence made Spinach Koftas in spinach curry. To be honest, i had a lot of green gravy in the fridge that i had made and stored in an air-tight container. Normally i do this when i buy a lot of good quality greens in bulk (at absolutely cheap price) at the Sunday market. The gravy stays good for 3-4 days, so i just take it out, add tadka, and top it with paneer, corn or some kofta. You can even make these koftas in a makhni gravy or a simple tomato curry. The koftas are a little crisp from outside and super soft from inside. 

I have made these koftas in an Appe Tava instead of deep frying them, inspired from Jeyshree's kitchen who writes a beautiful blog. There was no change in the taste and infact the meal turned out much healthier. 


Ingredients:

For the koftas :

Palak - 1/2 cup
Potatoes - 2 large
Red chilli powder - 1/2 tsp
Turmeric powder - 1/4 tsp
Corriander powder - 1/2 tsp
Salt - to taste
Pepper - to taste
Besan (Chickpea flour) - 1 tbsp

For the curry (which i had already made earlier like a palak paneer gravy) : The measurements here are only for the Kofta recipe

Palak - 1 medium bunch
Green chillies - 2
Corriander leaves - 1/2 cup
Garlic - 3/4 chopped finely
Corriander powder - 1 tsp
Garam masala - 1.2 tsp
Amchur powder - 1/2 tsp
Turmeric powder - 1/4 tsp
Salt - to taste
Oil - 1 tbsp
Curd - 1 tbsp

Recipe:

Koftas:

Wash the palak and chop it well. Mix it with mashed potatoes and all the other spices as well as besan.

Make equal sized balls out of it. Flatten them just a little with your fingers.

Heat the "Appe" pan and brush a little oil in each hole.

Place the kofta balls inside each hole, and brush the top of the koftas with a little oil again.

Turn it on the other side and cook till both sides become golden brown.

Remove aside on a paper towel.

Gravy :

Wash the Palak well. Chop it roughly. Heat water in a vessel till boiling point and add 1 tsp salt. Add the Palak to it and switch off the flame. Cover the vessel and let it stand for 5 minutes or so. Drain and immediately hold the leaves under running cold water or put them in ice cubes. 

After blanching of Palak is done, remove water completely and grind the leaves in a mixer grinder to a smooth paste along with green chillies and corriander leaves.

Heat 1 tbsp oil in a pan. 

Add garlic and fry till it browns.

Then add the palak paste and fry for a couple of minutes. 

Now add all the dry spice powders, salt and mix well with the paste.

Add about 1/2 cup of water (Add more if required), and curd.

Keep stirring in between and let the gravy simmer for about 5 minutes.

Add the koftas just before serving.

You can also add 1/2 tsp of lemon juice to the gravy instead of amchur powder, but skip adding curd then.


Green Kofta curry is ready :))

Happy Cooking ! :)


Thursday, 12 March 2015

Bharwan Lal Mirch Achaar

Last week was one busy week! Not busy because of tedious work, but because of some fun times! :) I can say so, since my work is absolute fun - Pet sitting! But apart from that, it was a long weekend - The festival weekend and as some of you who follow my blog must have seen, i didn't post any Holi special. I was even too late to catch up with some of my friend's messages and wishes and posts which i did yesterday. We didn't have any plans to celebrate Holi, since we were just two of us, not too pally with neighbors except the "hi-hellos" and moreover had my pet-sitting bookings. 

Over the morning cup of coffee, me and hubby were just discussing about how Holi was played back home when we were kids. The preparations would start 2 days earlier with purchasing colours, pichkari, making balloons of coloured water, mom oiling hair and skin so the colours are easier to remove and playing in mud-water!!! We used to pull people out of their homes and colour them! And mom always used to make lip smacking Puran polis and Kataachi amti. Memories!!!

Then came a surprise!!! The bell rang and neighbours came with some gulaal and an immediate plan was made for a lunch-party!!! Sometimes we connect instantly with some people, and that's exactly what happened. The celebration extended to dinner and also to the weekend!!! So there was dahi wada, puran poli, kataachi amti, Khandeshi chicken, Mutter paneer, Mutton curry, Tandoori chicken and Chole Bhature!!!

All this cookin done in pajamas, and no photographs taken??!! There are reasons for it:

1. We were just 2 females to make all of this menu. So, by the time everything always got ready, we were too hungry to click photographs.

2. We were so enjoying the chit-chats and sharing the "About-me" with each other, that the thought of clicking a photograph didn't cross my mind at all.

3. The most important : Sometimes, it's best just to eat and enjoy the dish than style and photograph it. Don't you all agree? ( I am going to write a different post elaborating on this point soon)

So, i shall make all the stuff again and post pictures and recipes :)


Coming back to the post. As i have mentioned before about my love for Chutneys & Pickles , who would know it more than hubby dearest. So one fine day he comes home with 3 big red chillies and says, "See what i got, make something with it". This is his common trait. He would see some ingredient or vegetable or product and would get it home just to try something new. Not that i have to complain, infact i love it. Helps increase my knowledge about food stuff. So, while i was scratching my brains on how I should use the chillies, i received a whats- app image from a friend of her Green chilli pickle!!! Voila!!!! I knew what i had to do!!

This is one easy recipe and makes absolutely droolworthy pickle. I didn't have peeli sarson (yellow mustard seeds) with me, so i used the regular black mustard seeds.


Ingredients:

Big red chillies - 3
Chilli powder - 1 tsp
Dry ginger powder (sonth) - 2 tsp
Mustard seeds - 2 tsp
Fenugreek seeds - 2 tsp
Fennel seeds - 1 tsp
Salt - to taste
Turmeric - 1/2 tsp
Sugar - 1 tsp
Vinegar/lemon juice - 2 tsp
Asafoetida - 1/4 tsp
Mustard oil - 1 tbsp

Recipe:

Wash the red chillies and pat them dry.

Let them dry well under the fan or in sun for 1-2 hours.

Remove the stems and slit lengthwise one side vertically keeping the other side intact.

Put turmeric and little salt on the chillies and coat them well (also from inside).

Put it aside for about half an hour.

Now, dry roast the fennel seeds, mustard seeds and fenugreek seeds till they become brown and leave fragrance.

Grind them to a powder in a mixer grinder along with sugar.

Add asafoetida, chilli powder and dry ginger powder to this mixture.

Add the lemon juice or vinegar, oil and salt.

Mix it all well and fill the mixture inside the chillies.

Put the chillies in a dry sterlised glass bottle, cover with a thin muslin cloth and let it be in the sun for 4-5 days.

If you don't want to keep it in the sun, then you can add hot Mustard oil on top, cover the jar tightly and keep it aside at room temperature for a day or two.


Bharwan pickle is ready :)

Happy Cooking! :)


Wednesday, 4 March 2015

Dinkaache laadoo

We all know of the famous quote "Change is the only thing constant in life". As much as it is true when applied to life, i think it is true with one's food habits too. We all liked some ingredients/dishes as kids which now we don't fancy much, or vice-versa. Take laadoo for example. As a kid, I would eat rava laadoo or besan laadoo which was made during Diwali (I still do, but just 1-2 is enough now for the taste as compared to when i was younger, i would love and relish eating lots of them). I am not much of a fan of Motichoor ladoos, but we Maharshtrians make "Aalivache laadoo". I don't know if you all are aware of it. My mother used to make them at home. Ahh, the name has got me drooling as i haven't had them in ages! It's definitely one of the blog post soon (though they are best eaten in winters).

Aaliv is water cress seed or garden cress seed, also known as "Halim" in Hindi. Just as aaliv ladoos are eaten in winters, Dinkaache laadoo are best eaten in winters too. So, though i am late for this post, i thought of posting it seeing the cold windy airs and "rains in February" climate doing the rounds in India. Dink means gum in marathi , also known as "Gond" in Hindi. I was not much of a fan of these laadoos until my mother in law made them for me once! Since then, she always makes a point to pack these laadoos for me. These laadoos are sent by her from Pune and i thought i will archive the recipe, so in future i can make them too.


I have had Dinkaache laadoo at the famous Chitale Bandhu in Pune. No doubt, they were good, but the saazuk tup (homemade ghee) or the amount of dry fruits or good quality edible gum that my mother in law uses beats the commercial laadoos any day. One laadoo and a glass of milk serves as a nutritious breakfast for kids, or even adults. These laadoos are given to lactating mothers for fast recovery and it is known to increase milk production. When eaten in winters, it helps keep the body warm. So these laadoos definitely have loads of pluses - one more to add to be known as great energy boosters.

There are various ways in which these are made. Some add whole wheat flour instead of daal. Some add more of coconut instead of dry fruits. The nuts and dry fruits choices varies according to people, and some add jaggery/sugar according to choice. Now my Mother-in-law here has made these with urad daal and without sugar/jaggery.


Ingredients:

Urad daal - 250 gms
Kaju (cashews) - 250 gms
Badam (Almonds) - 250 gms
Pistachios - 250 gms (optional)
Kharik (dry dates) - 250 gms
Dry coconut (grated) - 250 gms
Dink (Edible gum) - 100 gm
Khajur (Dates) - 1/2 kg (You can use less of these, if adding jaggery or sugar)
Ghee - Between 1/4 kg to 1/2 kg
Nutmeg powder - 1 tsp
Cardamom powder - 1 tsp


Recipe:

Take a pan and dry roast the urad daal. Keep stirring till it becomes brown. Now let it cool. After it cools down, make a powder of it in the mixer-grinder.

Remove seeds from the dry dates and make them into small pieces. Dry roast it for a while and let it cool. Now powder them in a mixer-grinder.

Follow the same procedure for the dates, if you don't have seedless dates. 

Dry roast the kaju, badam and pistachios lightly and grind them to a powder in mixer grinder or just coarsely grind them with a mortar-pestle.

Heat 2 tbsp ghee in a kadhai and fry the edible gum (they will puff up immediately). Remove when they are light coloured.

In the same pan, roast dry grated coconut till it becomes light brown.

You can grind the roasted coconut and edible gum to a powder in mixer and grinder or just coarsely grind it in mortar pestle.

Add little more ghee to the pan (around 2 tbsp more if required), and now fry the urad daal peeth (powder we made earlier) for about 8-10 minutes. Make sure it doesn't burn or become dark brown, so keep sauteing it.

Now add the remaining ghee to this. Mix well.

Remove from stove and add the coconut, edible gum, the dry fruits and nuts, cardamom powder and nutmeg powder and both the dates.
If you feel they are less sweet for your taste, add little powdered sugar or melted jaggery.

Roll into ladoos and store in an air tight container.


Happy Cooking :)


Saturday, 28 February 2015

Cabbage Foogath

Goa!!! That word surely make my eyes shine as my love for that place grows each and every time i visit it. I must have visited Goa every year before i shifted to Delhi, and each time i have come back a little happier, a little wiser. Yes, Goa has a lot to offer than just beaches and beer. There is so much to learn about the history, culture, traditions and of course cuisine. Though Goa is known for it's seafood, there is a wide variety of choices for vegetarians too. Not to miss the amount of spices and variety of vinegar available there only adds to to the variety of dishes.

Though world cuisine has taken it's spread in Goa, there is still an immense influence of Portuguese food in a lot of traditional dishes served. We all know the famous Vindaloo. Traditionally, the name was Vin-dahlo (meaning vinegar and garlic). So, the basic recipe of Vindahlo was with Garlic, shallots, sea salt, pork, some khada masala as cinnamon, black pepper, cloves and of course vinegar! That's it! It was slow cooked on wood-fire in clay pots for hours together which would be carried by people travelling in ships from one place to other.

Less spices (majorly whole spices), slow cooking (usually on traditional stove-tops of wood or coal) and using what was available locally together amalgamated this wonderful fusion cooking. So, East Indian cuisine has a lot of influence of British, Portuguese and Maharashtrian cuisine. I will have a different post about it someday. But just for the information, East Indians were the original inhabitants of Mumbai !! The details caught my eye on a recent television show i saw recently and hubby gifted me this amazing cookbook by Chef Michael Swamy :


Cabbage Foogath is a recipe i adapted from this book. Foogath is a Goan word that came from the Portuguese word " Refogar " meaning "to fry with oil or butter and seasoning". So, foogath is basically a vegetable side dish that is cooked with minimal ingredients and is ready within minutes. It is extremely easy and extremely flavourful. Foogath can be made from french beans, ivy gourd or even capsicum. Some add curry leaves, some add fresh grated coconut on top. I didn't have both, so i skipped (neither has it been mentioned in the recipe book). Some even add cashews or vinegar for a different taste.


Ingredients:

Cabbage : 250 gm
Ghee - 2 tbsp
Salt - to taste (Sea salt or rock salt tastes great, but normal salt would do too)
Pepper - to taste
Garlic - 8-10 sliced thinly
Poppy seeds (Khus khus) - 1 tsp
Onion - 1 small (chopped) The recipe didn't call for it, but i added for a different taste.

Recipe:

Wash and Grate/ shred the cabbage finely.

In a pan, heat ghee. You can use oil too.

Add poppy seeds. When they splutter, add the garlic. Saute till they are brown.

Add the onions and saute till they are translucent.

Add in the cabbage , salt and pepper.

Mix well and saute for about 5 minutes.

Cover the pan with lid and steam cook for another 3-5 minutes. Keep stirring in between to avoid burning and ensure even cooking.


Traditionally, it is served hot with rice, but tastes great with a roti or paratha too. 

Happy Cooking :)


Friday, 27 February 2015

Cabbage Cucumber soup

As i have mentioned before, cooking is an art learnt through observation, sharing and practicing. Once you learn the basics, the sky is the limit. There are times when a dish goes wrong - it turns out too salty, or too sweet or little too hard or little too bland. But there are always some additions or subtractions that can be done to make it right! Or altogether make it into a new dish :) But that's how one learns, isn't it?

Writing this blog is not only giving me immense happiness but has changed my eating habits too. The desire to make something new, or to keep on upgrading my cooking skills (Majorly to get that smile of a full satisfied tummy on hubby's face) has resulted in me starting to eat ingredients that i was not much fond of, a few years back! I don't know whether i have developed that taste, or my palate has changed, or its excitement of trying something different... but it surely is all happening for good and i am thoroughly enjoying this journey.

Just as i was not much fond of soups except the regular Tomato soup or Sweet corn soup, these days i enjoy gulping down a bowl of different varieties of them. And more so, to make and try them at home! I tried the spring onion soup recently, of which i haven't taken a pic, so i will make it again and post the recipe. This cabbage cucumber soup is one rich, creamy thick soup and has mild flavours. It is filling and goes absolutely great with a salad, noodles or a sandwich.


Ingredients:

Cabbage - 1 n half cups chopped
Cucumber - 1 medium chopped
Salt- to taste
Garlic - 6-7 chopped
Onion - 1 small chopped (optional)
Pepper - to taste
Cream - on top to garnish (I used homemade cream - just whisked it smooth)
Butter - 2 tbsp
Corriander powder - 1 tsp
Bay leaf - 1
Cumin powder - to garnish
Water - about 2-3 cups (Add more if required)

Recipe:

Wash and chop the vegetables well.

In a pan/pot, add butter. Now add the bay leaf. 

Add the garlic and saute till they turn brown. Add in the onions (if adding) and saute till they are translucent.

Add cabbage and mix it all well. Cabbage will start leaving water slowly and cook it its own steam. Keep stirring, so it doesn't stick to the bottom and burn. If you find it happening so, add in a little water or vegetable stock. Let it cook for about 3-4 minutes.

Add the chopped cucumber, salt, corriander powder and pepper. Mix it all well. Cover the pan with lid and cook for about 2 minutes.

Now add the vegetable stock or water and let it come to boil.

Cover and cook till the vegetables turn soft.

Let it cool. Remove the bay leaf.

Make a smooth paste of the cooked vegetables in a mixer-grinder or with a hand blender.

Put this creamy rich soup back in the pan and simmer for about 5 minutes. Add more water if the soup is too thick. Check for seasoning.


Garnish with cumin powder and cream.

Happy Cooking :)


Wednesday, 25 February 2015

Lemon Rice

Me and hubby are not so much of rice-eating people, but just so that we should have a balanced diet, we have started incorporating rice once or twice a week in our diet. Also, on suggestion of a friend of mine to include lot of rice dishes in the blog, i have started making different types of rice at home. A normal rice dish at our home would have been daal-rice or biryani. But past few days, i have made palak rice, masala bhaat, paneer pulao and Lemon rice. I made them all for the first time, hence didn't click pictures as wanted to get a good hold of the flavours. Now that i know the basics, i will make them again and post recipes.

Lemon rice is one of the most easiest and tastiest pot meal i have eaten. Pot meal is basically one dish containing starch, proteins and vegetables and is cooked with no fuss. Normally, one-pot-meal should have all the elements in itself and should not be accompanied by anything else. A risotto (Italian), Noodle soup (Chinese) or a pulao, for that matter would be called a One-pot meal. In today's times of our busy schedules, a pot meal makes for a perfect choice and provides all the nutrients to the body. So, whether you cook in a pressure cooker, a wok or a pan, it has to be all cooked together as the name suggests.


Lemon rice is basically eaten in south of India. The best part of this dish is it can be made with leftover rice. Just add spices to the cooked rice and your meal is ready. As the name suggests, it's basically a subtle hint of lemon and crunchy peanuts mixed with rice to make a non-spicy but flavorful rice dish.

Ingredients:

Rice - 3/4 cup
Oil - 2 tbsp + 1 tbsp
Lemon juice - 2 tbsp (Add more if you wish to)
Peanuts - 2 tbsp
Mustard seeds - 1 tsp
Asafoetida (hing) - 1/4 tsp
Curry leaves - a few (I used the dried curry leaves, since i didn't have fresh ones)
Urad daal (Split black gram) - 2 tsp
Red chillies - 2
Turmeric powder - 1/2 tsp
Salt - to taste


Recipe:

Cook 3/4 cup rice in enough water till the grains are "just" cooked. Don't overcook the rice as the grains will stick together.

Now drain the extra water (the water will be milky-full of starch), and spread the rice in a plate. Fluff it with fork just to separate the grains.

You can skip this altogether if you have cooked rice (leftover) already ready.

Let the rice cool down.

Heat 1 tbsp oil in a pan/pot/vessel and fry the peanuts till brown in colour. Remove aside.

To the same pan, add 2 tbsp oil. Add mustard seeds. When they crackle, add the hing. Remember to let the mustard seeds crackle.

Add the red chillies and curry leaves. Saute for about 30 seconds and immediately add the urad daal.

Saute till the daal turns brown in colour. Don't make it black or else it will give a burnt taste. So make all of this on a low flame.

Add in the fried peanuts, turmeric powder and salt.

Mix it all well and saute for about 15-20 seconds.

Now switch off the burner. Add in lemon juice and mix in the rice.

Mix well so that the rice is coated with the spices.

Now cover the pan with a lid and let the rice rest for about 5 minutes, so all flavours are blended well.


Serve it along with some Papad or raita or salad. Or have it plain just as it is :)

Happy Cooking :)

Tuesday, 24 February 2015

Pav

There are so many types of breads in this world, the list really amazes me! Each country, region or town have their own distinct version of bread. The basic ingredients remain the same, but just "a hint of this, and an addition of that" changes the whole flavour, texture and taste of the bread. One of my blogger friend from Norwegia (Sharon) has recently sent me their local bread recipe, which i am going to make soon and post it on the blog. 

I have grown up with eating Pav from mumbai in my Vada Pav's and Pav bhaji's. So when i came to Delhi, the taste of the Pav was completely different for me. Pav is Indian bread, but the concept of it was introduced to us by the Portuguese in 15th century. The early Portuguese presence in India was "Missionary-heavy" and they made bakeries and baking a priority. These missionaries trained and taught the converts in Goa, the art of baking bread. Since yeast was not readily available, they used to bake with fresh coconut Toddy.


Well, making Pav is super fun. I purposely made small buns and gave them a round shape. But you can shape them as you want. Making them small surely helped since i was making it for the first time and they turned out super soft. 

I served some as a tiffin breakfast to hubby by spreading jam and butter in between. And some, i made into mini-burgers :))


Recipe adapted from : Ammaji's kitchen


Ingredients:

Maida (All purpose flour)- 1 and half cups
Yeast - 2 tsp
Salt - 1/4 tsp
Sugar - 1 tbsp plus 2 tsp
Milk - 1/4 cup ( Add more or less as needed)
Butter - 1 tbsp (melted)
Water - 1/4 cup

Recipe:

Take a bowl and grease it with oil. This bowl is to be used for raising the dough, so take a little bigger one.

Yeast: There are two types of yeast. Instant and Active dry. If you have instant yeast, there is no need to activate it. But if you have dry yeast, you have to activate it. This process is called proofing. It is always beneficial if you proof the yeast.

Take 1/4 cup water and warm it. It should be lukewarm and not hot. If it is too hot, the yeast will die and if it is too cold, the yeast will not raise. Add about 1 tsp sugar to it and mix well. Now, add the yeast. Mix and cover the bowl and let it sit for about 8-10 minutes. The yeast will rise a bit.

In another mixing bowl, add flour, salt, sugar and butter.

Now make a small well in between and add the yeast. Mix well and now add milk little by little. The amount of liquid added depends on the strength of the flour. So don't add everything at once.

Add slowly and start kneading the dough. Knead for about 10 minutes.

Place this in the greased bowl, cover and let it sit for about 1 n half hours to raise.


Now, take out the raised dough, spread some flour on the wooden board and knead it for another 5-7 minutes till all air comes out. 

If the dough is too sticky, add some flour and knead again.

Make equal sized balls and flatten them a little or shape according to your wish.

Grease a baking tray with some butter or oil and place the balls in the tray leaving little space in between for them to rise up.

Cover this and let it sit for another 1 n half hours to rise.

Please keep the bowls to raise at room temperature only. 

After about 1 n half hours, preheat the oven to 180 degrees Celsius.

Brush the raised dough balls with olive oil/normal oil or milk and bake them for about 30 minutes till the top becomes golden brown.

Remove from the oven and brush some melted butter on them.

Let them cool.


Pav is ready :)

Happy Cooking :)


Monday, 23 February 2015

Gaazrachi chatni : Carrot Chutney

In my last post of Methi Thepla , i mentioned that i served it along with Carrot Chutney. Normally theplas are served along with pickles, but i made this sweet and spicy chutney and it went very well with them. I made the chutney again, and used it as a spread over bread toast and had them as a snack. That tasted flavourful too! So, this chutney is definitely a hit at our home now. I am sure it will taste great with idli-dosa too. It's very easy to make and lasts for about a 4-5 days in refrigerator in air tight container.


To make it last long, i added a spoonful of hot mustard oil on top when it was done, just before storing it in refrigerator. You can also add vinegar instead of the oil, to get a tangy taste. 

Ingredients:

Carrots - 2
Mustard oil - 2 tsp plus 1 tsp on top
Mustard seeds - 1 tsp
Cumin seeds - 1 tsp
Green chilli - 1
Red chilli powder - 1/2 tsp
Turmeric powder - 1/4 tsp
Salt - to taste
Sugar - 1 tsp
Asafoetida - 1/4 tsp
Onion - 1/2 chopped finely


Recipe:

Wash and peel the carrots, and grate them.

Now, there are two ways to make the recipe. Either blanch the carrots for a while before making a paste or directly make a paste in the blender.

I made the paste directly. Try not to add water. But if needed, add just a spoonful to make a fine paste.

Crush the green chilli coarsely in a mortar and pestle.

Heat oil in a kadhai, add mustard seeds. Once they crackle, add hing and cumin seeds.

Now add the green chilli paste and onions. Saute till the onions are translucent.

Now add the carrot paste.

Saute for about 2-3 minutes and then add the red chilli powder, turmeric powder and salt.

Now keep stirring and mixing it well, till it starts forming a ball. It will leave water (if any) and then start leaving oil. Make sure it doesn't stick to the bottom of kadhai.

Now add in the sugar and mix everything well. Remove from heat and let it cool.


Adjust the red chilli powder or Green chillies according to taste.
The sugar is added just to give a sweet taste, but if you want a spicy chutney, skip that.

Carrot chutney is ready :)

Happy Cooking :)