Showing posts with label Chutneys and Pickles. Show all posts

Friday, 14 August 2015

Karwandacha Moramba (Natal plum jam)

One of the many reasons i love stocking up on chutneys, jams, pickles is my laziness at times :) Yes, there are times when i hardly feel like cooking an elaborate meal standing in the kitchen for long hours. At such times, pickles or morambas come in handy. All i would do is roll a paratha or stuffed roti or a simple plain chapati and spread some jam or chutney, roll it and give it in tiffin to hubby. That saves me from cooking a daal and a sabzi, yet having the satisfaction of given a meal that would fill his tummy :)


Karwand, also known as Karonda or Natal Plum is not grown so commercially in India, yet it thrives well in subtropical regions of India. The fruit is native to South Africa, and some tribes there even consider it as a staple food. This sour-sweet fruit is available in green colour when unripe which is commonly used to make pickles, a little whitish coat when they are just ripening and then dark pink when they are fully ripe. This juicy fruit lasts only for about a week when uncooked and are great for jams, pickles and chutneys. 


Natal plum contains a great amount of Vitamin C, hence good for skin, teeth and gums. In traditional medicine, this fruit was used to boost immune system because of it's high content of iron and hence drive away cold, flu's, fatigue and dizziness. Usually this fruit can be eaten with seeds, but i removed them since i decided to make my mother-in-law's recipe of moramba.


Moramba or Murabba is basically a sweet fruit preserve made with fruits, sugar and spices. When we went to the Wednesday Farmer's bazaar near our home, we saw these plums and my hubby made me buy them instantly. Back home, one phone call to Saasu-maa (mother-in-law)  and this quick jam was ready within half an hour. There is no need to peel the plums, use the skin too. 


Made with just 4 ingredients, this jam tastes absolutely delicious with plain or masala parathas, or just spread over a slice of bread. The taste is sweet and sour both with a lovely aroma of cardamom.

Preparation time : 15 minutes
Cooking time : 10 minutes
Recipe type: Jams and preserves
Serves : 4-6 people

Ingredients:

Karwand (Natal Plum) - 1/4 kg
Sugar - 1 cup
Water - 1/4 cup
Cardamom seeds - 5-6


Recipe:

Wash the natal plums and pat them dry.

Powder the cardamom seeds in a mortar and pestle.

Cut each of them into half and remove the seeds. 

Bring to boil 1 cup sugar and 1/4 cup water in a saucepan.

When the sugar consistency becomes one-thread, put the chopped plums into it.

The plums cook quickly, so keep stirring and keep and eye till they become soft.

Add the cardamom powder and switch off the stove.

Let it cool before pouring it in a glass container.

Refrigerate and store till about a week.

Doesn't it look tempting? Karwandacha moramba is ready :)


Happy Cooking!!! :)


Monday, 27 July 2015

Chunda

There are times when you try so hard that you lose yourself! (Ahm... Ahm...I'm in a philosophical mood today). So, people who just want to check the recipe, please scroll down :) Those who have some time at hand, join me in for a talk! :)

I see so much struggle everywhere - the constant need to prove you are the best, at times, even stepping on others! Can't we all just smile at the fact that we all are born as individuals and we all are unique. We each have our own space and place in this world (of course, hard work and talent matters!). Past one week i did a lot of social media (just checking other people's posts or pages on Facebook and Instagram), and at times i would feel sad/get depressed. There is so much of hatred, pulling other people down attitude and jealousy amongst people that it started affecting me. And i wonder why such posts get highlighted and the one's who are doing their work with genuinity always lies in the bottom. Why can't we all work together towards a better living?

Love this quote!
I always feel, competition is good, but it should be healthy. In old good days, or even now when you visit any wholesale market, you will always find similar product-selling shops in one lane. Like for example, there are lanes of spice market, or lanes of stationery shops or lanes of medical shops. Why, then do they not feel competition when two adjoining shops are selling similar items. Why do the owners sit and have a cup of chai together discussing about life and business? Guess, the elders know- that each has their own!!!


My granny always used to tell us, "Appreciate each person for what they are and what they are doing". I have followed that and always wished well for others. At times, i have been cheated or even taken for granted, but those are life-lessons learnt. That wont stop me from wishing well for others!

Well, on days like these when i feel black and white or grey, i want to add some colours to this post! So i decided to write about "Chunda". It's the very last month of getting nice fresh raw mangoes!! Last week i got some to make more of chunda, so it lasts us till the next summer. The earlier one i had made was just of 1/4 kg mangoes (For trial, it's always best to make in small quantities). It turned out so delicious that it was finished in a jiffy!!!


There is "Saakharamba" (sweet mango pickle) that my mom used to make often, but this one here is a little of this and a little of that! You will get flavours of spice, sour and sweet. I have made this the traditional way by keeping the mixture in a glass jar and in sunlight. There is a quick stove top method too, but since i had time at hand, and usually the sun God favours us a lot in Delhi, i thought why not make it the "old-style" way?!!


Chunda is basically a Gujrati pickle and is called as Chundo in the local language. It tastes best with Theplas (you can check the recipe of Methi thepla here ). The same way masala thepla or ajwaiin thepla can be made to have with Chunda. Chunda tastes best even with poori-sabzi, daal-chawal or just with a simple chapati.

Ingredients:

Raw mangoes - 1/4 kg
Sugar - Around 2 cups (Add less or more depending on the taste. Adding more of it, will give it a sweeter taste removing all the sourness of the raw mango. But i like it a little sour, so 2 cups was perfect. If you want, you can later on mix powdered sugar if you find it too sour)
Turmeric - 1/2 tsp
Salt - to taste
Cloves - 1/2 tsp (optional)
Cinnamon - 1 inch stick (optional)
Red chilli powder - 1/2 tsp
Cumin powder - 1/2 tsp (I roasted the cumin seeds and crushed them in a mortar and pestle)


Recipe:

Wash the mangoes and pat them dry.

Peel the skin and grate them. Add in the salt and turmeric powder and keep it aside for about 3-4 hours.

You will see that the mangoes have left some water. Now add in the sugar little by little till the sugar is dissolved.

Place this mixture in a glass jar or steel vessel and cover it tight with a muslin cloth and keep in the sun everyday for about 7-8 days. You will see that the sugar melts completely and starts to thicken. At the end of the day, bring the vessel inside, stir it with a spoon and store it covered in a cool, dry place. The next day follow the same procedure.

Now, add in the red chilli powder, cloves, cinnamon, salt and the cumin powder. Stir it all well and place in the sun again for a day or two so that the flavours get mixed properly. You can eat it immediately but it tastes best when the flavours are blended in well.

Cinnamon and cloves addition is totally optional, but it does help enhance the taste and aroma too. You can also add it to the mango-sugar mixture instead of adding it later on.

Chunda lasts for about a year if the mangoes chosen are absolutely raw and fresh. Don't buy mangoes that have become little ripe or have yellowish pulp.

Also make sure the glass jar you store it in is dry and sterlized.

Chunda is ready :)) Comes to the rescue when you are bored of doing elaborate cooking :) Just spread it on a bread and eat or make a plain paratha and serve with this chunda :)


Wishing you all a great colourful week ahead. Much smiles :)

Happy Cooking :)


Wednesday, 8 July 2015

Lemon pickle (Sweet)

Hello everyone! Here i am back to my writing :) Yes, my last post was almost 15 days back and i have been feeling guilty about it for quite a while, but giving it a thought, all bloggers have gone through this phase, isn't it? Where we wanted to write but couldn't find time, got busy with something else, some other commitment or priority took our interest or sometimes just too lazy to pen down things! I have seen some dedicated blogger friends who post almost everyday and salute to them. But for me, blogging is all about "me-time", about finding peace, about getting relaxed, refreshed and rejuvenated! Yes, that's exactly what this blog means to me. I don't want to get into a compulsive mode that i have to write posts! This is no competition, no race, no ego but just my space :)) And thank you to each one of you who read it regularly and appreciate my efforts.


So, in my post of The chaat trail in Old Delhi, I had mentioned about my mother-in-law teaching me some "Dadi ke nuske" :)) This easy pickle is one i learnt from her. A friend once told me that in old days, all the elder ladies of the home (those days, there were joint families) would get furious if the young bahus (daughter-in-law's) of the home made a good pickle or chutney. And why??? Because that was their "department"... Haha, yes! "Elders only department" wherein the expertise would only be centered to the dadi's and nani's (Grannies) or sasu-maa's (Mother-in-law's). Hence, we know a lot of recipes are lost. Some are carried forward with daughters trying it out seeing their mothers do it, but a lot of them are lost due to the ego's of humans :(


Well, so before some more recipes are lost in history, it's best to pen them down in a blog for generations ahead to remember :) I always thought making pickle was tedious and tough. But i learnt that it's all about the basics:
1. Using vinegar/salt/sugar/lemon juice or oil is the best form to preserve a pickle.
2. Always use a clean sterlized and dry bottle to store the pickle.
3. Pickle stays best in glass or ceramic containers.
4. No drop of water should touch the pickle whatsoever, so while taking out the pickle, always make sure the spoon is dry.
5. The most important - a pickle tastes best when you add the ingredients on your judgement and not by measuring cups :))


The last point we will learn with time, but for the time being, all we got to know if use good quality ingredients with the basics of red chilli powder, salt, turmeric, and oil and your pickle is ready! Unless you are making a specialty pickle or a sweet pickle like this one :


While choosing lemons, take ones which have a thinner skin. If you buy thick skinned lemons, then blanch the whole lemons, pat them dry and then use. 

Ingredients:

Lemons - 1/2 kg
Salt - to taste ( about 1/4 cup )
Turmeric powder - 1 tbsp
Sugar - 1/2 kg
Red chilli powder - 1-2 tbsp
Cumin powder (jeera) - 1 tsp

Recipe:

Wash the lemons and pat them dry or keep in sun for about an hour or so. Now cut each lemon in about 8 pieces equally. Remove seeds.

Add salt, cumin powder, red chilli powder, turmeric powder to the lemons and cover and keep overnight. ( You can keep this for more number of days but since my mother-in-law was here only for a week, we kept it overnight. Keeping for more number of days would surely enhance the taste, but this, my friends, is as yummy as it looks )

Add about a cup of water to sugar and make a one-string consistency sugar syrup. 

When the syrup cools down, add the marinated lemons to it and mix well.

Fill the pickle in a dry clean sterlized glass container and close the lid tight.

The pickle tastes best when eaten after a week or so, but the real taste comes after about 3-4 months. These pictures seen here are for 2 month old pickle.

Make sure you periodically stir the pickle well with a dry spoon. This pickle should not be kept in sun, but can be made in traditional way by adding sugar to the marinated lemons, stirring/mixing it everyday till the sugar melts.

Either ways, the taste would be different, so it's worth a try :)

I simply love making chutneys and pickles, for the very fact that i have to worry less to make breakfast recipes for hubby's tiffin. A plain paratha with pickle makes him happy :)


More pickle recipes coming soon :)

Happy Cooking :)


Wednesday, 20 May 2015

Peru chi chatni : Guava chutney

In my last post of Cabbage Cake , I had mentioned that i served it along with "Peru chi chatni". Peru is guava. Though this is not the season for the fruit, and it's raining mangoes in the market these days, i am anyways posting the recipe before the pictures go in some "lost" folder in the laptop :)


If you are looking for some great Mango recipes, you can check :
1. Mango Kulfi
2. Amrakhand (Mango shrikhand)
3. Instant Mango pickle
4. Methamba


So, there are times when you are bored of your regular green chutney and you want to add a twist to it! I have tried the corriander chutney, corriander mint chutney, mint chutney, mixing these chutneys with curd and sometimes with spices, or sometimes with mayonnaise!!! But the last time when i had guavas in the refrigerator, i decided to try the guava chutney and i was surprised to see the results! I made this chutney in 2 ways :

1. I added just a hint of guava and more of corriander and mint leaves to the chutney 
2. I took more quantity of guava and less of corriander skipping mint this time.

Both ways, it tastes absolutely great and i would want all of you to try it out, once the guavas are back in season :)


Ingredients:

Corriander leaves - 1 cup
Mint leaves - 1/2 cup
Guava - 1/2
Lime juice - 1 tsp (adjust according to taste)
Cumin seeds or cumin powder - 1 tsp
Green chillies - 1-2
Black salt - to taste

Recipe:

Wash the mint leaves and corriander leaves well.

Wash guava, and remove the seeds aside. Use only the outer portion of the guava discarding the seeds. Chop the guava roughly into small pieces.

Put all the ingredients in a mixer and grind to a smooth paste adding little water at a time till it reaches desired consistency. Don't make it too runny.

You can have this chutney as it is or try mixing it with curd or mayonnaise for a different taste.

The other method in which i made the chutney is similar but the ingredients are as follows : 


Guava - 2 (outer skin only)
Corriander leaves - 1/2 cup
Lime juice - 1 tsp
Green chilli - 1
Cumin powder - 1/2 tsp
Black salt - to taste


Note: This version of chutney will be slightly thicker. Add water if you want the consistency to be thinner but adjust the spices and salt accordingly then.

This chutney makes a great spread for parathas too to pack in tiffin.


Happy Cooking :) 

Thursday, 12 March 2015

Bharwan Lal Mirch Achaar

Last week was one busy week! Not busy because of tedious work, but because of some fun times! :) I can say so, since my work is absolute fun - Pet sitting! But apart from that, it was a long weekend - The festival weekend and as some of you who follow my blog must have seen, i didn't post any Holi special. I was even too late to catch up with some of my friend's messages and wishes and posts which i did yesterday. We didn't have any plans to celebrate Holi, since we were just two of us, not too pally with neighbors except the "hi-hellos" and moreover had my pet-sitting bookings. 

Over the morning cup of coffee, me and hubby were just discussing about how Holi was played back home when we were kids. The preparations would start 2 days earlier with purchasing colours, pichkari, making balloons of coloured water, mom oiling hair and skin so the colours are easier to remove and playing in mud-water!!! We used to pull people out of their homes and colour them! And mom always used to make lip smacking Puran polis and Kataachi amti. Memories!!!

Then came a surprise!!! The bell rang and neighbours came with some gulaal and an immediate plan was made for a lunch-party!!! Sometimes we connect instantly with some people, and that's exactly what happened. The celebration extended to dinner and also to the weekend!!! So there was dahi wada, puran poli, kataachi amti, Khandeshi chicken, Mutter paneer, Mutton curry, Tandoori chicken and Chole Bhature!!!

All this cookin done in pajamas, and no photographs taken??!! There are reasons for it:

1. We were just 2 females to make all of this menu. So, by the time everything always got ready, we were too hungry to click photographs.

2. We were so enjoying the chit-chats and sharing the "About-me" with each other, that the thought of clicking a photograph didn't cross my mind at all.

3. The most important : Sometimes, it's best just to eat and enjoy the dish than style and photograph it. Don't you all agree? ( I am going to write a different post elaborating on this point soon)

So, i shall make all the stuff again and post pictures and recipes :)


Coming back to the post. As i have mentioned before about my love for Chutneys & Pickles , who would know it more than hubby dearest. So one fine day he comes home with 3 big red chillies and says, "See what i got, make something with it". This is his common trait. He would see some ingredient or vegetable or product and would get it home just to try something new. Not that i have to complain, infact i love it. Helps increase my knowledge about food stuff. So, while i was scratching my brains on how I should use the chillies, i received a whats- app image from a friend of her Green chilli pickle!!! Voila!!!! I knew what i had to do!!

This is one easy recipe and makes absolutely droolworthy pickle. I didn't have peeli sarson (yellow mustard seeds) with me, so i used the regular black mustard seeds.


Ingredients:

Big red chillies - 3
Chilli powder - 1 tsp
Dry ginger powder (sonth) - 2 tsp
Mustard seeds - 2 tsp
Fenugreek seeds - 2 tsp
Fennel seeds - 1 tsp
Salt - to taste
Turmeric - 1/2 tsp
Sugar - 1 tsp
Vinegar/lemon juice - 2 tsp
Asafoetida - 1/4 tsp
Mustard oil - 1 tbsp

Recipe:

Wash the red chillies and pat them dry.

Let them dry well under the fan or in sun for 1-2 hours.

Remove the stems and slit lengthwise one side vertically keeping the other side intact.

Put turmeric and little salt on the chillies and coat them well (also from inside).

Put it aside for about half an hour.

Now, dry roast the fennel seeds, mustard seeds and fenugreek seeds till they become brown and leave fragrance.

Grind them to a powder in a mixer grinder along with sugar.

Add asafoetida, chilli powder and dry ginger powder to this mixture.

Add the lemon juice or vinegar, oil and salt.

Mix it all well and fill the mixture inside the chillies.

Put the chillies in a dry sterlised glass bottle, cover with a thin muslin cloth and let it be in the sun for 4-5 days.

If you don't want to keep it in the sun, then you can add hot Mustard oil on top, cover the jar tightly and keep it aside at room temperature for a day or two.


Bharwan pickle is ready :)

Happy Cooking! :)


Monday, 23 February 2015

Gaazrachi chatni : Carrot Chutney

In my last post of Methi Thepla , i mentioned that i served it along with Carrot Chutney. Normally theplas are served along with pickles, but i made this sweet and spicy chutney and it went very well with them. I made the chutney again, and used it as a spread over bread toast and had them as a snack. That tasted flavourful too! So, this chutney is definitely a hit at our home now. I am sure it will taste great with idli-dosa too. It's very easy to make and lasts for about a 4-5 days in refrigerator in air tight container.


To make it last long, i added a spoonful of hot mustard oil on top when it was done, just before storing it in refrigerator. You can also add vinegar instead of the oil, to get a tangy taste. 

Ingredients:

Carrots - 2
Mustard oil - 2 tsp plus 1 tsp on top
Mustard seeds - 1 tsp
Cumin seeds - 1 tsp
Green chilli - 1
Red chilli powder - 1/2 tsp
Turmeric powder - 1/4 tsp
Salt - to taste
Sugar - 1 tsp
Asafoetida - 1/4 tsp
Onion - 1/2 chopped finely


Recipe:

Wash and peel the carrots, and grate them.

Now, there are two ways to make the recipe. Either blanch the carrots for a while before making a paste or directly make a paste in the blender.

I made the paste directly. Try not to add water. But if needed, add just a spoonful to make a fine paste.

Crush the green chilli coarsely in a mortar and pestle.

Heat oil in a kadhai, add mustard seeds. Once they crackle, add hing and cumin seeds.

Now add the green chilli paste and onions. Saute till the onions are translucent.

Now add the carrot paste.

Saute for about 2-3 minutes and then add the red chilli powder, turmeric powder and salt.

Now keep stirring and mixing it well, till it starts forming a ball. It will leave water (if any) and then start leaving oil. Make sure it doesn't stick to the bottom of kadhai.

Now add in the sugar and mix everything well. Remove from heat and let it cool.


Adjust the red chilli powder or Green chillies according to taste.
The sugar is added just to give a sweet taste, but if you want a spicy chutney, skip that.

Carrot chutney is ready :)

Happy Cooking :)


Wednesday, 28 January 2015

Gazaraacha loncha aka Gajar ka achaar aka carrot pickle

Pickles synonym "Mouth-watering", isn't it? I love making chutneys and pickles, it adds a zing even to a simple meal of daal-chawal. Last year when my mother had visited, she had stacked some Slurpee mix vegetable pickle and green chilli pickle for us. When i visit my mother-in-law, she always packs me a jar of pickle of lemon or mango. All homemade - Can it get better? When we had gone for a vacation to Kasauli ( Experiences at Kasauli ), i had picked up some local chutneys to carry back home. So to say, chutneys and pickles have always been a part of my kitchen. 

At times, some instant, quick and easy ones take shape in the kitchen too. My favourite being the "Danyachi chutney" meaning a chutney made literally in less than a minute with peanut powder. This is my all time favourite and have learnt it from my mother. Peanut powder, red chilli powder, salt, curd and water. Mix it all and eat it with parathas, dosas, or just apply it on a slice of bread. Yummy is the word!! 

Now, back to the recipe. Since it's the season that we get red, juicy and fresh carrots, i thought of making an instant carrot pickle. Recently, a bottle of mustard oil has made way in my kitchen (I honestly want to say, i had never used mustard oil till date but now, am loving it so much that almost all chutneys and pickles i am making recently are with the same). Yes, it does have a strong aroma, but its best used in this season and i have kind-of developed a taste for it.


Ingredients:

Carrots - 1/4 kg (Cut them in thin strips)
Asafoetida - 1/4 tsp + a pinch
Red chilli powder - 1/2 tsp (or according to taste)
Turmeric powder - 1/4 tsp
Salt - to taste
Sugar - 1/2 tsp
Dry ginger powder - 1/2 tsp (optional)
Ginger - 1/2 inch grated
Mustard seeds - 3/4 tsp (Actually you can add 1/2 tsp, mine was a little extra i guess)
Garlic - 3-4 cloves crushed
Fenugreek seeds - 1/2 tsp ( Dry roast them and crush them to a powder in a mortar and pestle)
Green chillies - 2-3 (or as required) Slit from between.
Curry leaves - a few
Oil (I used mustard oil, but you can use normal oil) - 3 tbsp
Vinegar - 1 tsp


Recipe:

Add 1/4 tsp asafoetida, red chilli powder, turmeric powder, salt, dry ginger powder and fenugreek powder to the carrot strips and mix well. 

Set aside for about 15 minutes.

Heat oil in a kadhai, add mustard seeds and a pinch of asafoetida. When the seeds crackle, add curry leaves, crushed garlic, grated ginger and green chillies.

Saute for a minute and then add the marinated carrot.

Saute till everything mixes well.

Remove the kadhai from fire, add vinegar and mix well. Let it cool.

You can add more hot oil from top if needed.

Store in refrigerator in air tight container. Lasts up to a week.

Instant carrot pickle is ready :))


Happy cooking :)

Tuesday, 14 October 2014

Naralaachi Chutney : Coconut chutney

Coconut is something that i don't find commonly here in Delhi, and back home we use coconut in almost everything (even curries and everyday sabzis). So, when i go to the weekly market here, i make sure i stack the coconuts and scrape them and keep them in air tight container in refrigerator. Lasts me for a week, till i get my next buy. 

I had made Coconut Barfis for Dusshera and had some fresh coconut left in the fridge. So, i thought of making this coconut chutney and all i had to bring home was some idli/dosa batter. One scrumptuous meal was ready for dinner :) This chutney is very easy to make and goes well with anything. You can also serve this with tomato omlette or just spread it on a bread slice and eat it (i do that at times for breakfast and it's so yummy).


Ingredients:

Fresh coconut (Grated) - 1/2 cup
Green chillies - 1 (adjust according to taste)
Cumin seeds - 1/2 tsp
Asafoetida - a pinch
Salt - to taste
Mustard seeds - 1/2 tsp
Oil - 1 tsp
Lemon juice - 1/2 tsp
Sugar - 1/4 tsp
Fresh curry leaves - a few

I didn't have corriander leaves at hand which gives a nice green colour to the coconut chutney, so my chutney is white. It doesn't change the taste though. If you have corriander leaves, do add them.

Recipe:

Put the coconut, green chillies, corriander leaves, salt, sugar and lemon juice in a mixer and make a nice paste.

If you want the chutney thin or runny, add a little of water or curd. Curd also gives a nice taste to the chutney but make sure to increase the quantity of green chillies then to balance the spice flavour. Or you can also add red chillies in the tadka later on.

Heat oil in a pan, add mustard seeds. When they crackle, add asafoetida and cumin seeds. Then add the fresh curry leaves and mix this well with the chutney.

Chutney is ready in less than 10 minutes :)

Happy Cooking!!! :)

Thursday, 12 June 2014

Kairiche Lonche : Quick Raw Mango Pickle

Its the age of Instant : With Instant messaging to instant age miracles, we are living in "Instant-era". With food too, there is Instant coffee, instant breakfast mixes, instant cake mixes and the list goes on. With stress hanging over hand, time management becomes a task and we turn to all "quick-things" in our life! As much as i am a lover of "slow-cooking", there are some recipes which are quick-to-make and taste delicious too! One such recipe ( i would go to the extent of saying, classic recipe ) by my mother is the "Jhatpat kairiche lonche". Jhatpat in Marathi means quick. Kairi is raw mango. Lonche is pickle. There are times when you don't have the time and patience to go about making pickle the traditional way. This recipe comes to the rescue and makes for a good accompaniment with paratha or daal-chawal.


This pickle stays for about 15 days if you put in air tight container and store in refrigerator. For the first 1-2 days, you can keep keep it outside at room temperature if it's not too warm. 

Ingredients:

Raw Mangoes - 2
Red chilli powder - 1 tsp ( because we like it spicy, add 1/2 tsp and then add more if you want more spice )
Turmeric powder - 1/2 tsp
Asafoetida - 1/4 tsp
Jaggery - 2 tbsp crushed or grated or even add small chunks or pieces, they anyways melt in the pickle )
Oil - 1 tbsp
Mustard seeds - 1 tsp
Cumin seeds - 1 tsp
Salt- to taste 


 Recipe:

Wash the raw mangoes and pat dry.

Chop them into small cubes ( you can even cut them in medium size ).

Add the red chilli powder, turmeric powder, jaggery and salt. Let it marinate for 5 minutes.

Heat oil and add mustard seeds. When they splutter, add asafoetida and cumin seeds.

Pour the oil on top of the marinated mangoes. Mix it all well. 

After some time, it will start leaving juices. I love this juice. But if you don't like, you can strain it. This juice is a nice mixture of sweetness of jaggery and spiciness of red chilli powder.

It totally tastes "Chataaaak" ( as we call it in Hindi or Marathi meaning flavourful )

Jhatpat pickle is ready :)

Happy Cooking :) 

Linking this recipe to : Only summer food and drinks by Shailaja and Pari's giveaway


Saturday, 7 June 2014

Kharda : Mirchicha Thecha

I haven't posted a lot lately as i had some crazy-busy weeks. Honestly, i had not cooked anything special to write about, apart from the regular sabzi-roti or daal-chawal. One for the fact, that i was too busy to cook anything special, yes... the 4 legged canine angels ( from my pet sitting appointments ) were keeping me busy. Since it's a vacation time, a lot of people going on holidays, my hands and my home was full. And believe me, nothing gets better than spending time with these cute bundles of joy. The walks, the play, the treat times everything keeps you on toes, but it's all worth it.
Here's a recent pic of mine, just to show you all how happy i have been.


But yes, i missed my kitchen and i missed my blog. It always was on the back of my mind to write something, but another reason took it's toll. Laziness!!! Yes, it's so super hot in Delhi that it really gets tough to stand long in the kitchen and cook something special. Managing the temperature for cooking becomes a difficult task, with everything going in the refrigerator every now and then. The fruits and vegetables rot, the chocolates melt, the cooked food becomes stale soon, and i hate to waste food. As the temperature rose to 44 degrees, all i wanted to do was drink water/fluids/juices/aam panna ( http://cookininpajamas.blogspot.in/2014/05/kairiche-panhe-aam-panna.html )
rather than eat. A light diet seems just enough than a whole cooked meal.

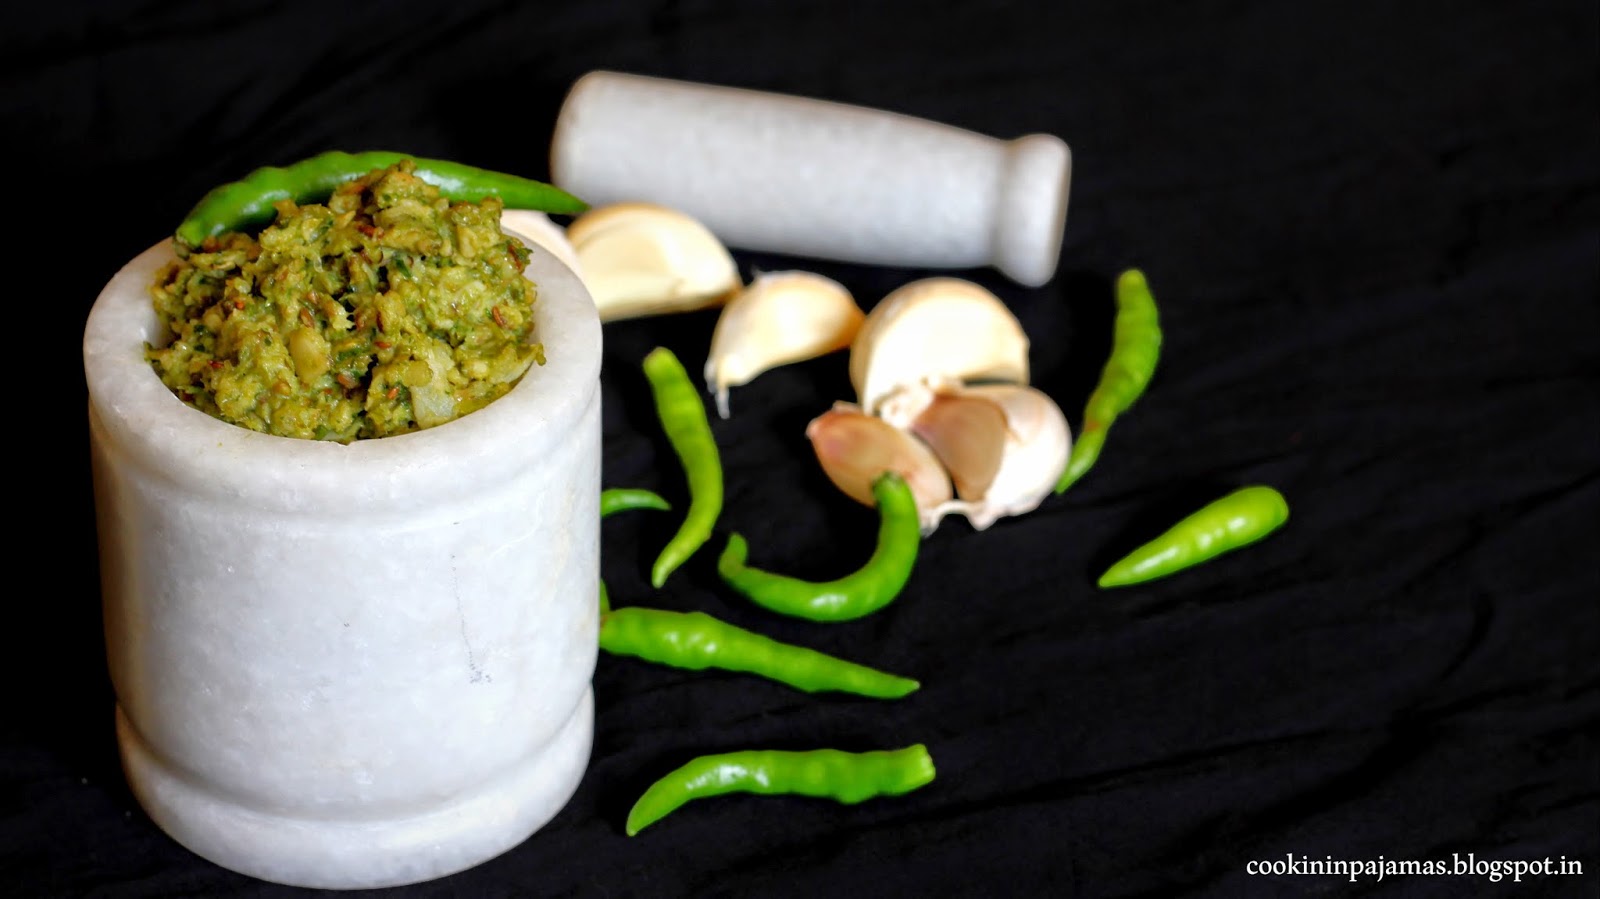
Now that i have some free time for couple of days with just one dog, i decided to get right in the kitchen and get going. Kharda is one of the Maharashtrian chutneys that you can enjoy alongside a daal-chawal or a paratha or traditionally we eat it with Bhaakri ( jowar/bajre ki roti ). Just yesterday i had made Vaangyacha Bharit ( Baingan Bharta ) and rotis and had it with Kharda. Also known as Thecha or Hirvya Mirchicha Thecha, this basically has two main ingredients of green chillies and garlic. 
You can even make it in bulk, store in refrigerator and add to any daal or sabzi , just to give a dish that "zing" of taste. Easy to make, it gets ready within minutes and for those who love things spicy, this is definitely worth a try.


Kharda is again a regional dish. Some make it roasting chillies in oil, some dry roast it, some add peanut powder, some make it without. Adding corriander leaves is optional too. It all depends on personal taste. I make all versions every now and then. This one is with peanut powder and corriander leaves.

Ingredients :

Green chillies - Around 30-35 
Garlic - 8-10 ( This time i had a different variety of garlic which had big chunks, if you have the normal variety take about 15 pieces )
Cumin seeds ( jeera ) - 1 tsp
Oil - 1 tsp
Corriander leaves - a few
Lemon juice - 1 tsp ( adjust to taste )
Black salt - to taste ( You can also use normal salt, but black salt adds to the taste)


Recipe :

Wash the green chillies, pat them dry and cut both the ends.

In a kadhai, put 1 tsp oil and fry the green chillies till they start getting brown spots. Frying chillies is a really tough task and the vapours get inside your nose and eyes, resulting in coughing, sneezing and running nose. So make sure to switch on your exhaust fan while doing this or keep the window/door of the kitchen open to let the vapour out.

Add the cumin seeds and fry for half a minute.

Now add the garlic and fry for about 5 minutes till the garlic gets properly sauteed and starts browning.

Let it cool and transfer it into a mixer jar. Throw in some corriander leaves, black salt and lime juice. mix it all well and grind to a coarse paste ( not too smooth and do not add water ).

Traditionally, the mixture is well grinned in a mortar and pestle. But since i don't have one here, i grind it in a mixer.

Now, would you like this "Death by chillies" ? ( Name derived from the famous sauce by Blair : Pure Death and After Death )

Happy Cooking :)


Tuesday, 20 May 2014

Methamba : One tangy relish !

Summers are associated with vacations from schools and colleges, holidays to hill stations, lots of play, visiting cousins and having ice-cold water right from the refrigerator! Yes, it has it's own fun! But for me ( and well, a lot more others, i am sure ) Summers meant ( and still does ) Mangoes!!! From the day mangoes would arrive in market, my mother used to convert the kitchen into a "Mangitchen"!!! Aamras along with puri or poli ( chapati) was a daily affair at lunch and dinner. Then there were days of mango milkshake, and mango icecreams. My Mom used to make great mango kulfi too. And of course, the pickle from raw mangoes, the refreshing drink Aam panna ( kairiche panhe http://cookininpajamas.blogspot.in/2014/05/kairiche-panhe-aam-panna.html )  and not to forget The Methamba.


Methamba is a raw mango chutney that is so sour, tangy and sweet that the flavours will burst in your mouth. It is a very simple Maharashtrian recipe. Some even call it "Methi-amba". Methi is fenugreek seeds and Amba is mangoes ( here raw mangoes or kairi are used ). It makes a great accompaniment with rice and daal or makes a great tiffin recipe when spread on a roti and made into a roll. It can also be eaten with a plain paratha or spread on a bread.


Ingredients :

(Makes about 1 n half cups of Methamba )

Raw Mangoes - 2
Mustard seeds - 1/2 tsp
Cumin seeds - 1/2 tsp
Asafoetida - a pinch
Oil - 2 tsp
Jaggery ( Grated ) - 3/4 cup ( You can even mash the jaggery with hand and mix if the jaggery is soft. Mine was hard, hence i had to grate it and it mixes well this way )
Red chilli powder - a pinch ( optional - just to get a hint of spicy taste )
Turmeric powder - a pinch ( optional )
Water - around 1/2 cup ( Just enough to cook the mangoes and make them soft )
Fenugreek seeds - 1/2 tsp
Salt - to taste

Recipe :

Peel the skin of the mangoes. Cut the mangoes into medium size pieces ( not too big, not too small - around 1 inch )

Heat oil in a kadhai. Add Mustard seeds, asafoetida and cumin seeds together. When they start to crackle, add the methi ( fenugreek seeds ). 

Saute till the methi is reddish in colour. Now add the chopped mango pieces. 

Saute it well, for about 2-3 minutes, so they get coated with oil and the seasonings.

Now add water and let the mangoes cook. You will know when they turn soft. If needed, add more water, but add little by little, as we don't want our methamba to be too watery. You can cover the kadhai or cook it in open. Mangoes anyway won't take long to cook.

Add in the jaggery and keep stirring continuously as the mixture will start becoming thick, the jaggery will melt. Make sure it doesn't stick to the kadhai.

Now add the red chilli powder, turmeric powder and salt. Mix it all well and let it simmer for about 2-3 minutes. Remove from heat and let it cool.

This can be stored in refrigerator for almost a week. But am sure it won't last a week, as it tastes so yummy that you would want to finish it off soon. 


This is a must-try summer recipe and am sure you all will love it :)

Happy Cooking :) 


 Linking this recipe to Favourite recipe event at Fullscoops and Swathi's event announcement page